


How Your Instrument Works: Part 2
Pads and Toneholes (mostly toneholes)

One feature of almost every modern woodwind is the use of pads. I have recently covered pads in some detail in a 5 part series of articles —the first one is here:
All About Pads: Part 1

One of the predominant features and points of discussion regarding woodwinds is the pads. What are woodwind pads? Why do we need them? Why is there such variety and so many choices?
Please read that series for details I may gloss over or omit here.
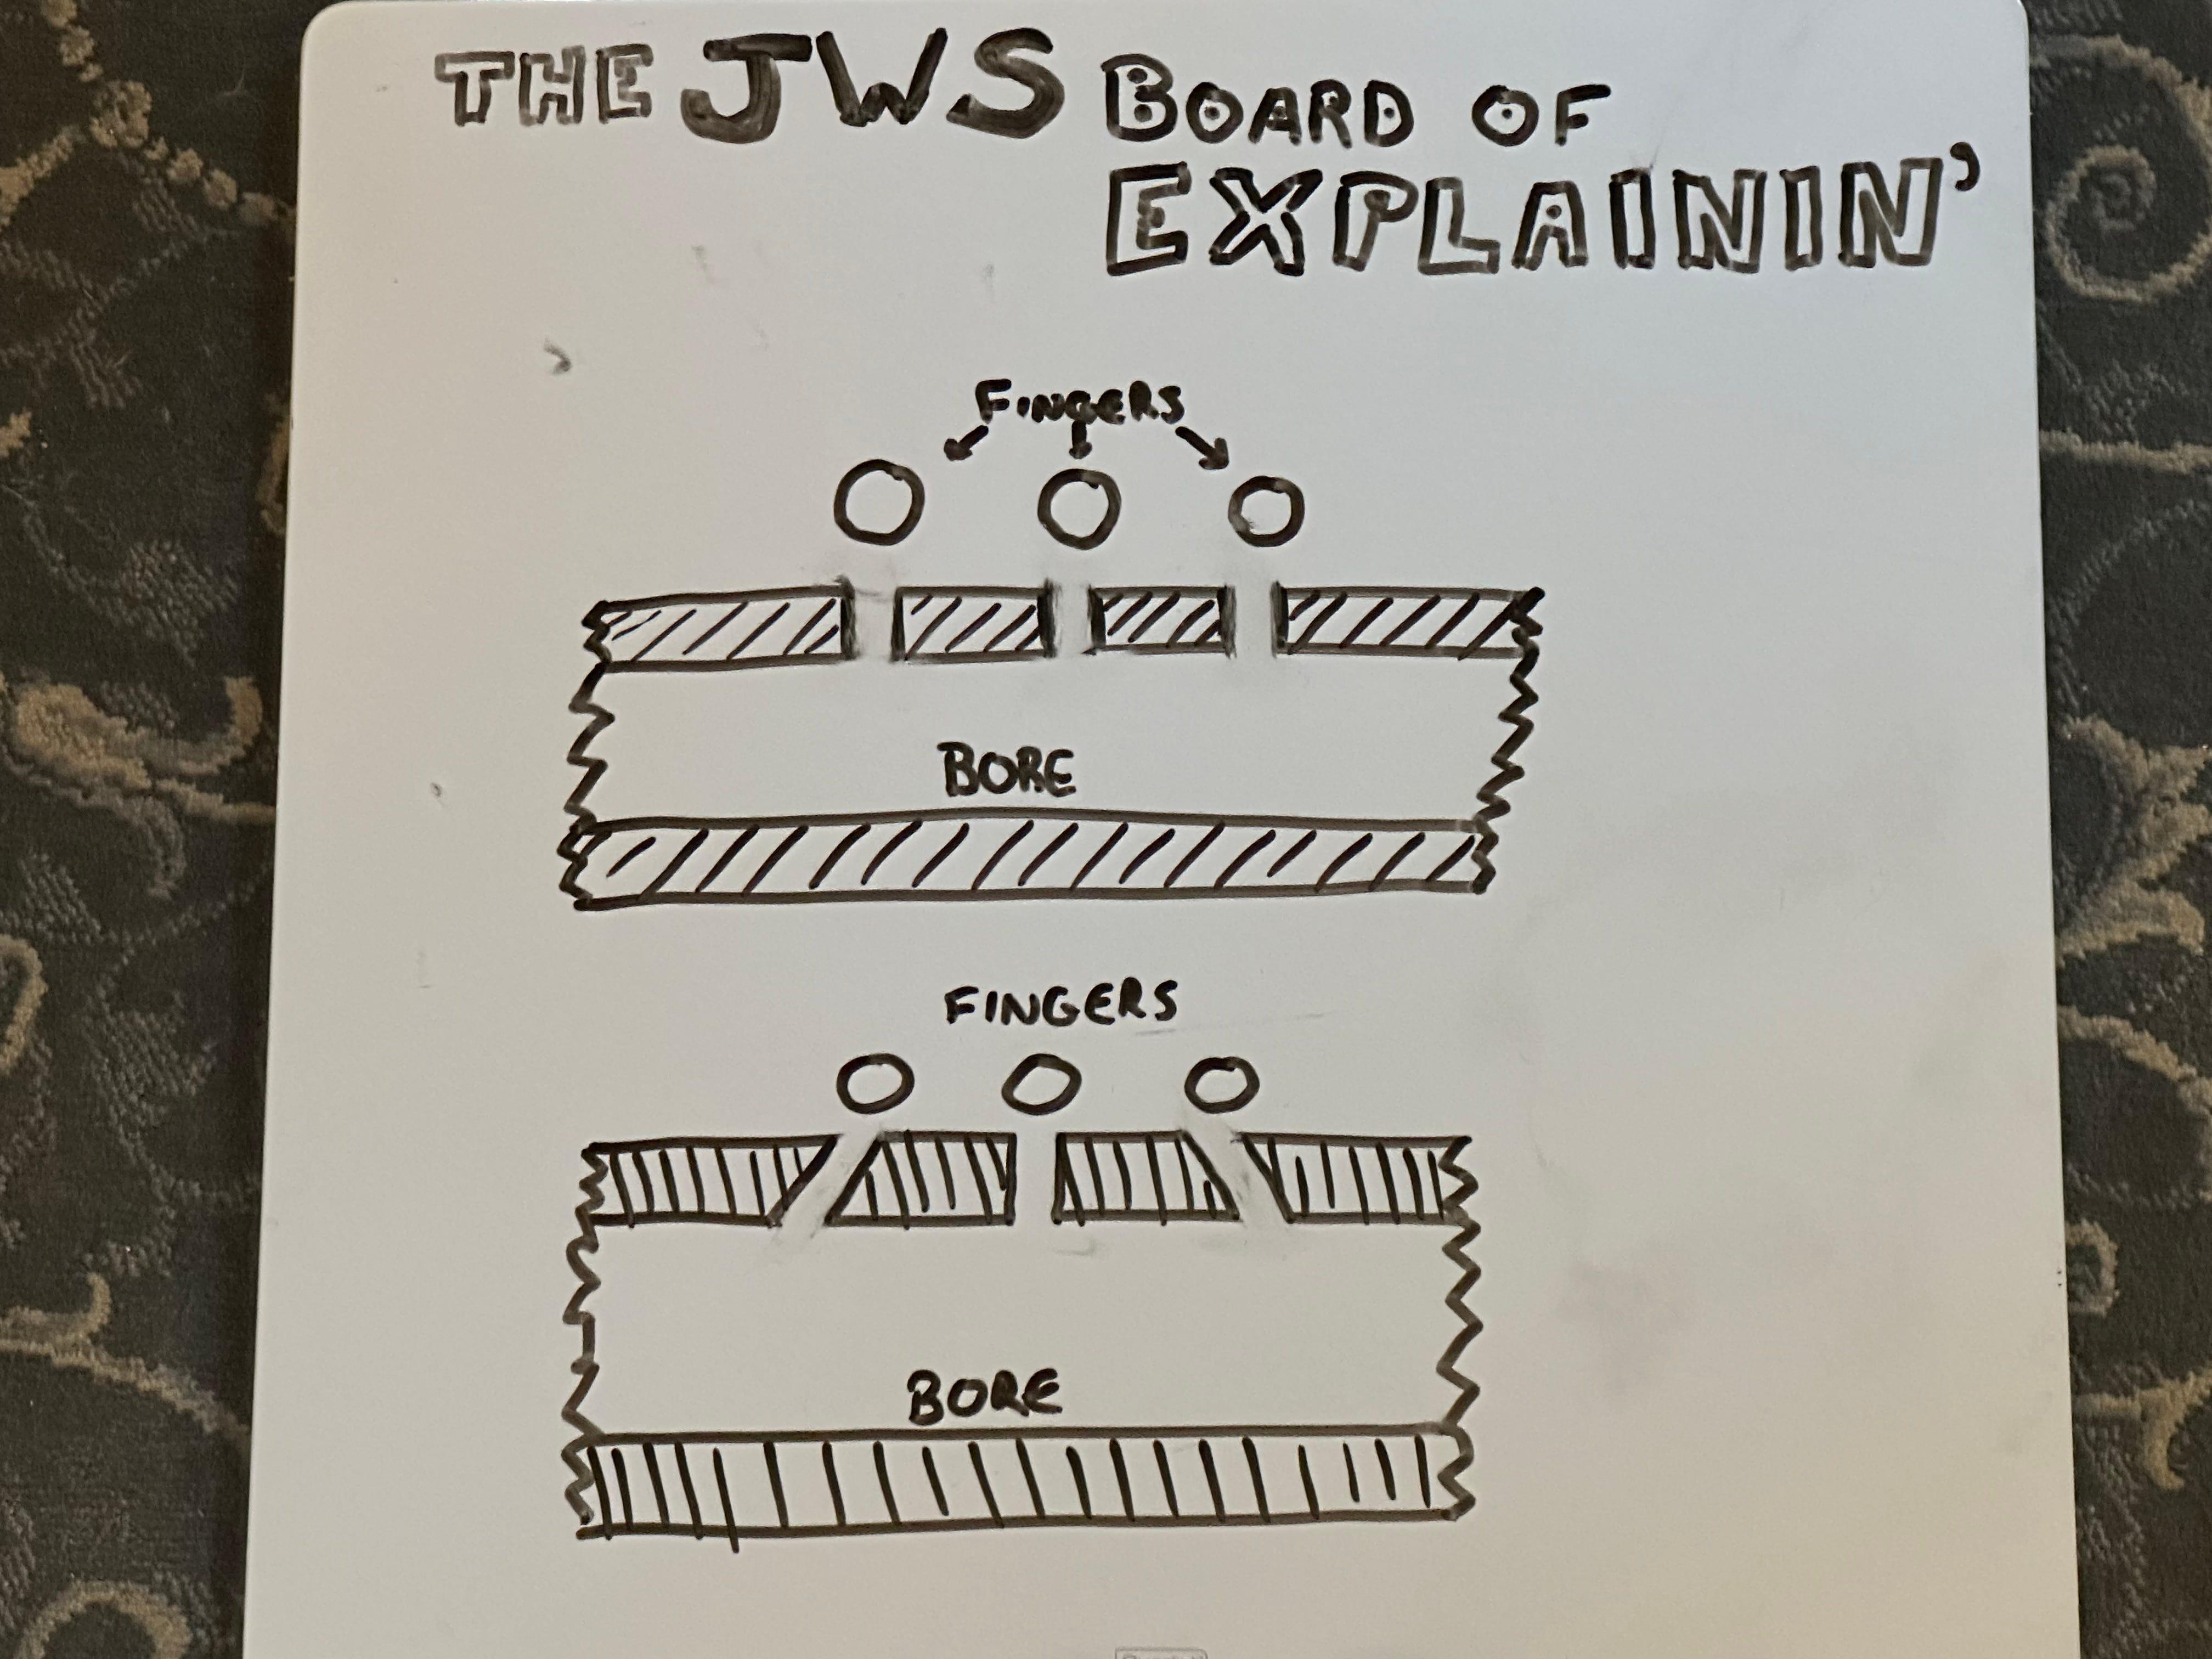
As touched on in last week’s article (and previous ones), woodwinds have toneholes positioned at specific places on the instrument to allow for the production of different pitches. These positions and size of the holes are determined by mathematical ratios and formulas which rely heavily on the geometry of the instrument’s full tube. Holes are usually not positioned with the shape, size, and flexibility of the player’s fingers in mind.
The design around anatomy used to be the case. Instruments were designed so that fingers could cover the holes. This was fine for smaller instruments, but as the instruments got larger to create lower sounds, holes needed to be spaced farther apart. Instrument makers came up with all sorts of work arounds, such as toneholes made on steep angles to the bore so that the fingers remained close together but the interior place where the toneholes met the bore were spaced farther apart. Such angled toneholes are still commonplace on modern bassoons.
Instrument makers could only push these modifications so far before compromises in response and tone quality became too much to deal with. In order to facilitate longer reaches to cover holes the fingers could not reach, the mechanical devices we know as keys were implemented.
For a more detailed history of the evolution of pads, see my previous articles on the topic.
Suffice it to say, these new mechanical appendages or extensions of the fingers needed some way to cover the toneholes in a similar way to the fingers. Human fingers have a bit of squish to them and for a long time that quality of hole covering, and indeed the amount of material protrusion into the top of the tonehole from the squish, was the goal in pad choice and application. Now, I don’t think that instrument makers had a chart of notable players’ finger tip measurements and notes about if their fingers were firm, supple, or callused. They were simply trying to duplicate the effect. A legato passage played on an instrument with bare fingers on the holes will often be easier to make perfectly seamless and smooth transitions between notes than when played with pad-covered holes. This is one of those if-you-know-you-know sorts of things and clarinet players are likely nodding along right now.
The problem with this traditional standard has 3 parts. First, fingers are imperfect. They literally leak through the fingerprints. Everyone’s fingers are different and even the squishiness of a single person’s fingers can change in a short period of time simply due to hydration and salt intake. There is no uniformity to rely on. Second, due to the variance of people’s anatomy and physiology where a certain amount of squish into the tonehole and leakage through the fingerprint can define how well an instrument plays, designers and engineers are dealing with built in compromises. By applying this standard to tonehole covering, they are limited in the amount of precision they can impart on the design and manufacture of the instrument. Third, while human fingers are imperfect and changeable, the pads with properties intended to replicate them are even more so.
This imperfect model has been the basis for techniques for “how to install a pad” for as long as pads have been around, but very few technicians or instrument makers understand or even ask, “why do we do it this way?” In the 21st century, this moving target of padding standards is changing.
Toneholes
Before we get to how things are changing, we have to discuss the other half of the equation: the toneholes. Having a pad that approximates the seal and feel of a human finger is great, but it has to contact against something. That something is the tonehole rim.
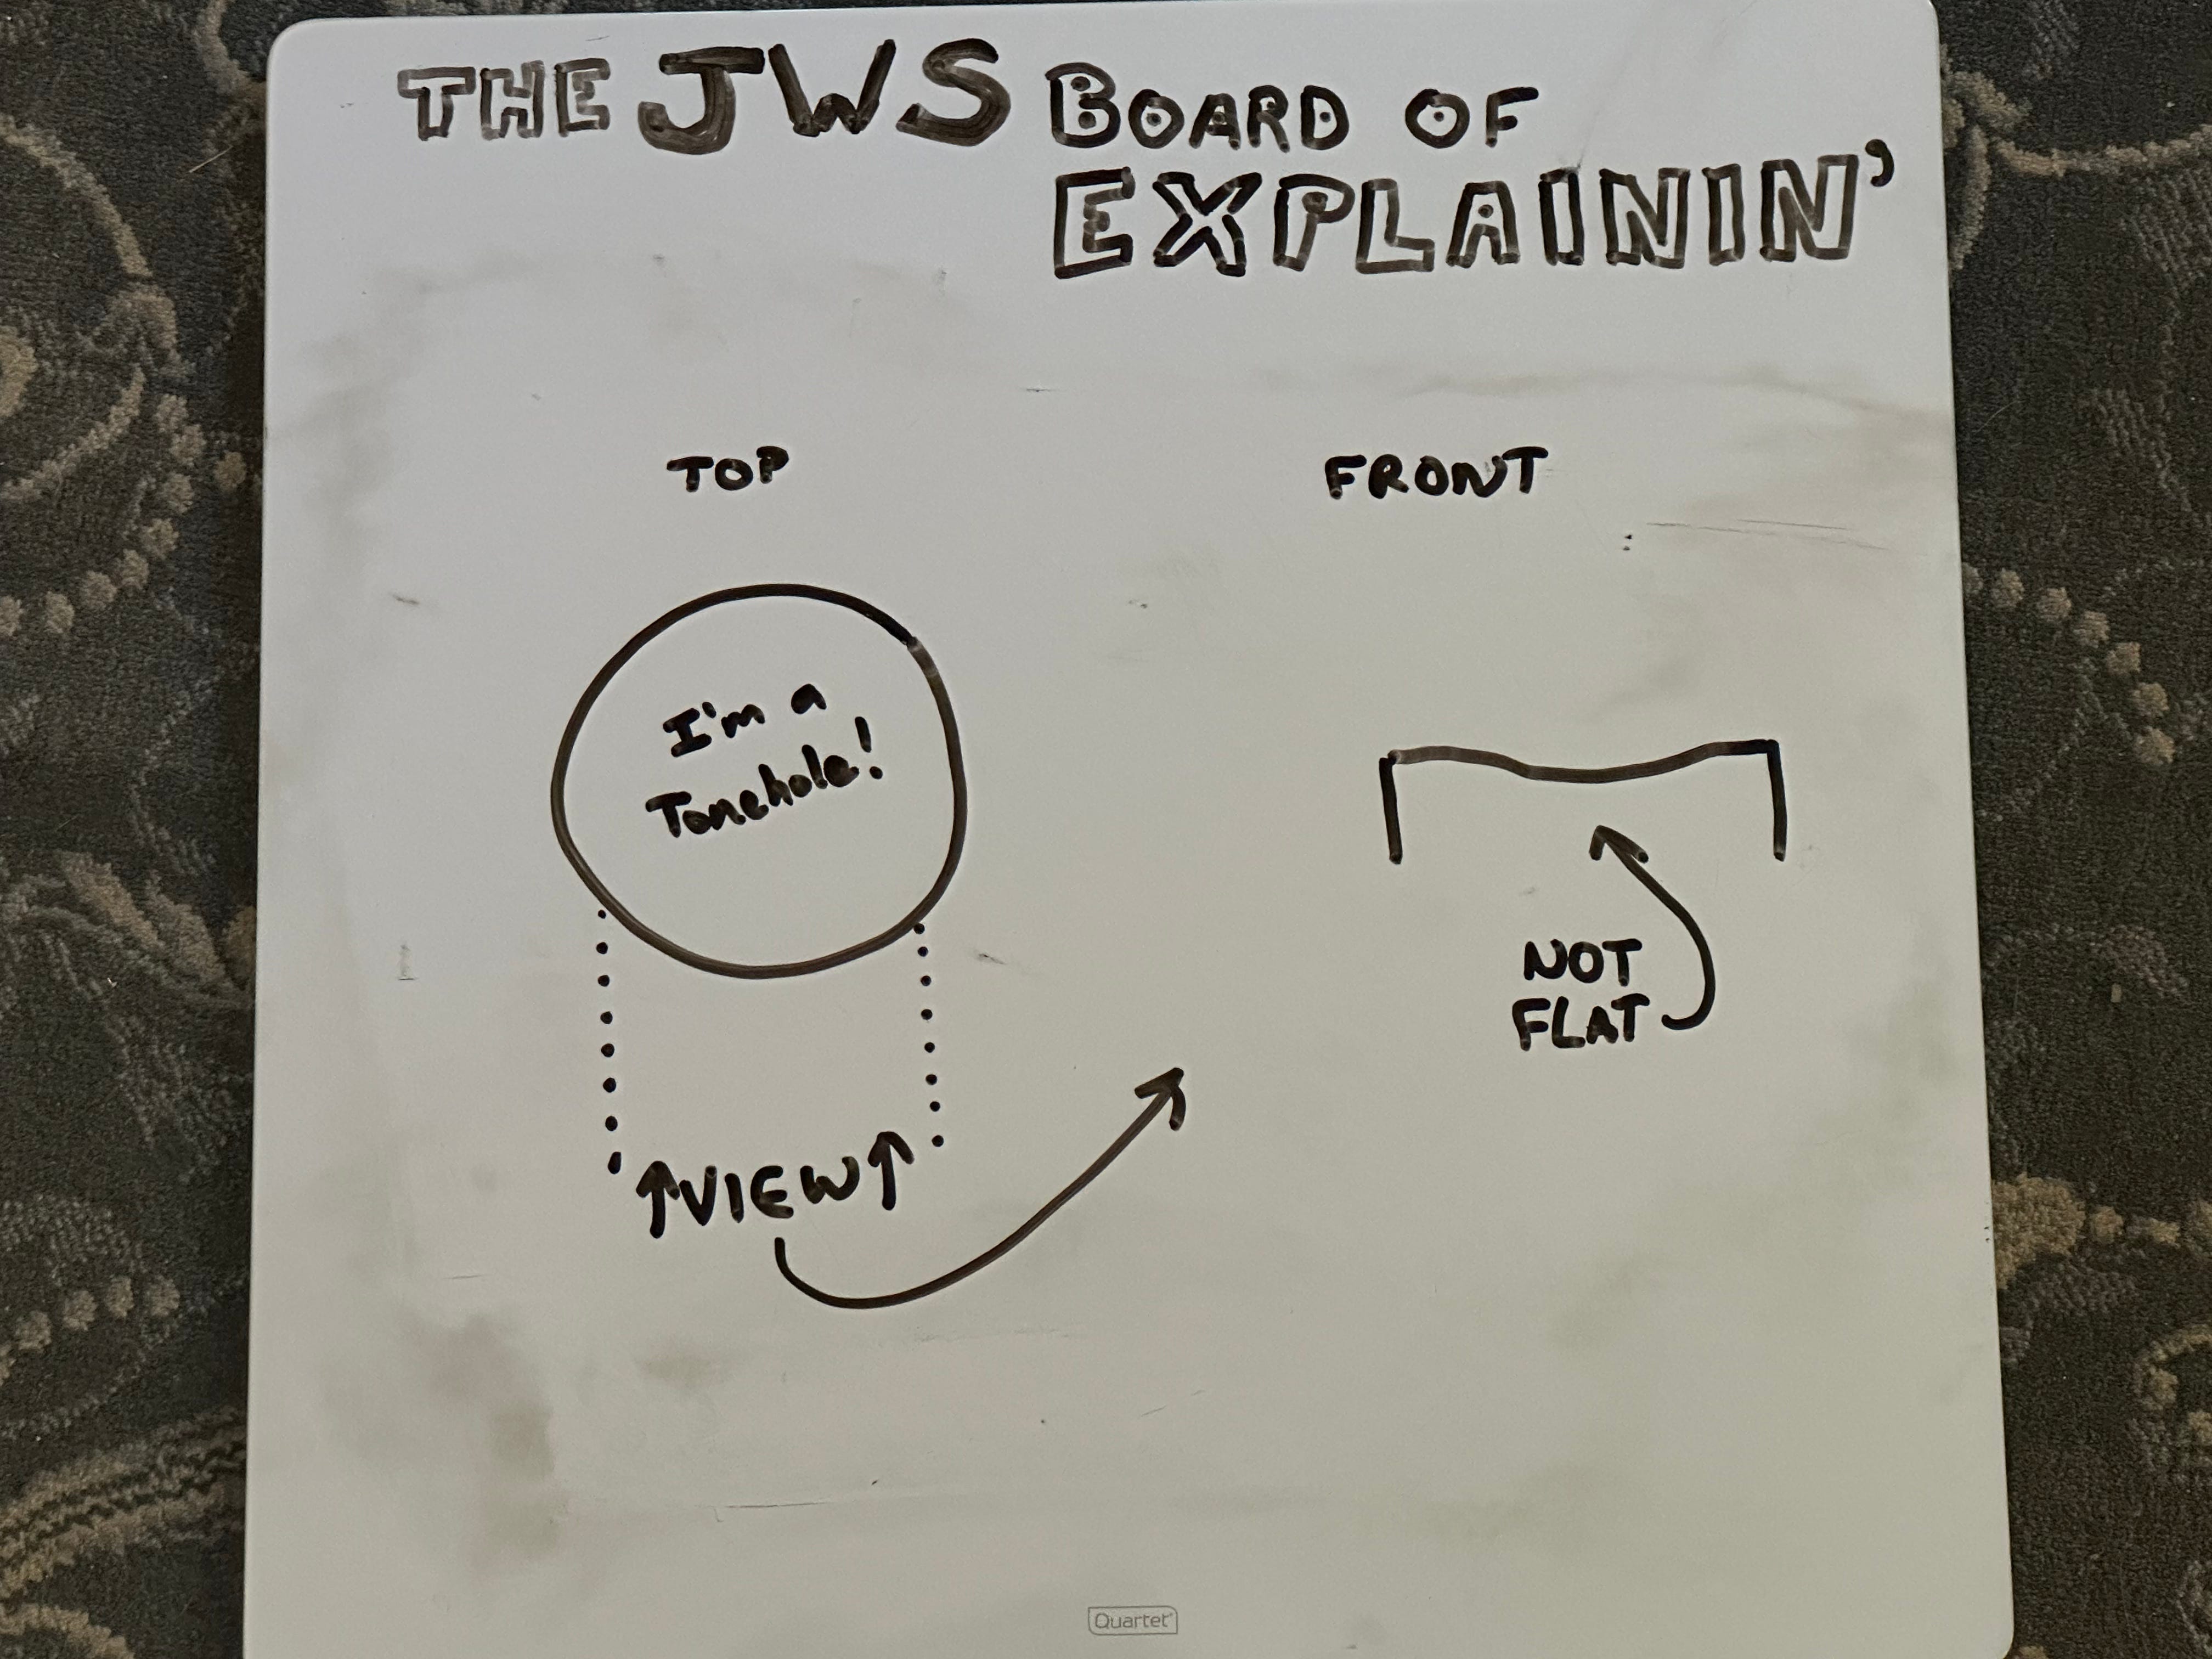
Toneholes come in many shapes and in as many materials as instruments are made of. The one universal feature all toneholes should have is that they are flat. If you have read my previous articles, you may have a sense of my feelings on mechanical precision and accuracy. Based on my standards and what I expect of myself, I have yet to see a woodwind emerge from a production facility that did not need some improvement on the flatness of the toneholes. This includes makers of very expensive hand made flutes. For the most part, the tonehole flatness is not bad, but it has some ways to go in refinement. The instrument makers who use mechanized processes for tonehole facing tend to have toneholes with the most deviation from flat.
Why does flat matter?
When a tonehole is not flat, the burden falls on the pad to fill up that void. If the non-flat area is only a very small amount, perhaps the material of the pad is squishy enough to conform to that dip or compress around the high spots. Perhaps the pad installer can manipulate the support structure of the pad to jack up the pad to confrom to that low spot. There are any number of techniques and dirty tricks pad installers can use to get around this suboptimal condition of the tonehole.
The more a pad is manipulated, the more a pad is shimmed, the more a pad has a “pad seat” imposed on it, the more unstable it is. Plus, as discussed in earlier articles, the pad is the most unstable part of the instrument (after the player). Why add things to introduce even more instability? Flat toneholes are a benefit to the padding process and, in my shop, an absolute necessity.
Tonehole Challenges
I do not necessarily fault the instrument makers for putting out instruments with toneholes that are not to my standards. It comes back to the business adage that the last 10% of need on the way to perfection will take 90% of the time. So they get the toneholes 90% of the way there—some more, some less.
It’s a business decision rooted in the market economy. If a company wants to sell their instrument for $8000, they can’t have their workers (who I hope are getting a living wage for their skills) spend 10-20 hours just obsessing over toneholes. But they can have them spend 1-2 hours and get them pretty good, maintaining their price point to be competitive in the process. I do not fault them for this. It will be addressed when the instrument goes for its first overhaul. Some new instruments require overhauls sooner than others due to the tonehole condition and padding games played to accommodate it.
There are challenges baked into tonehole design and how one goes about dealing with them properly.
Flatness and Flexing Metal
The first has to do with the nature of metal bodies and how they flex and distort under pressure. Don’t worry, your flute or saxophone isn’t going to deform like play dough, but the metal does have the ability to flex. It almost always returns to its original shape (look up modulus of elasticity for some bed time reading) but the fact that it does indeed flex is the point.
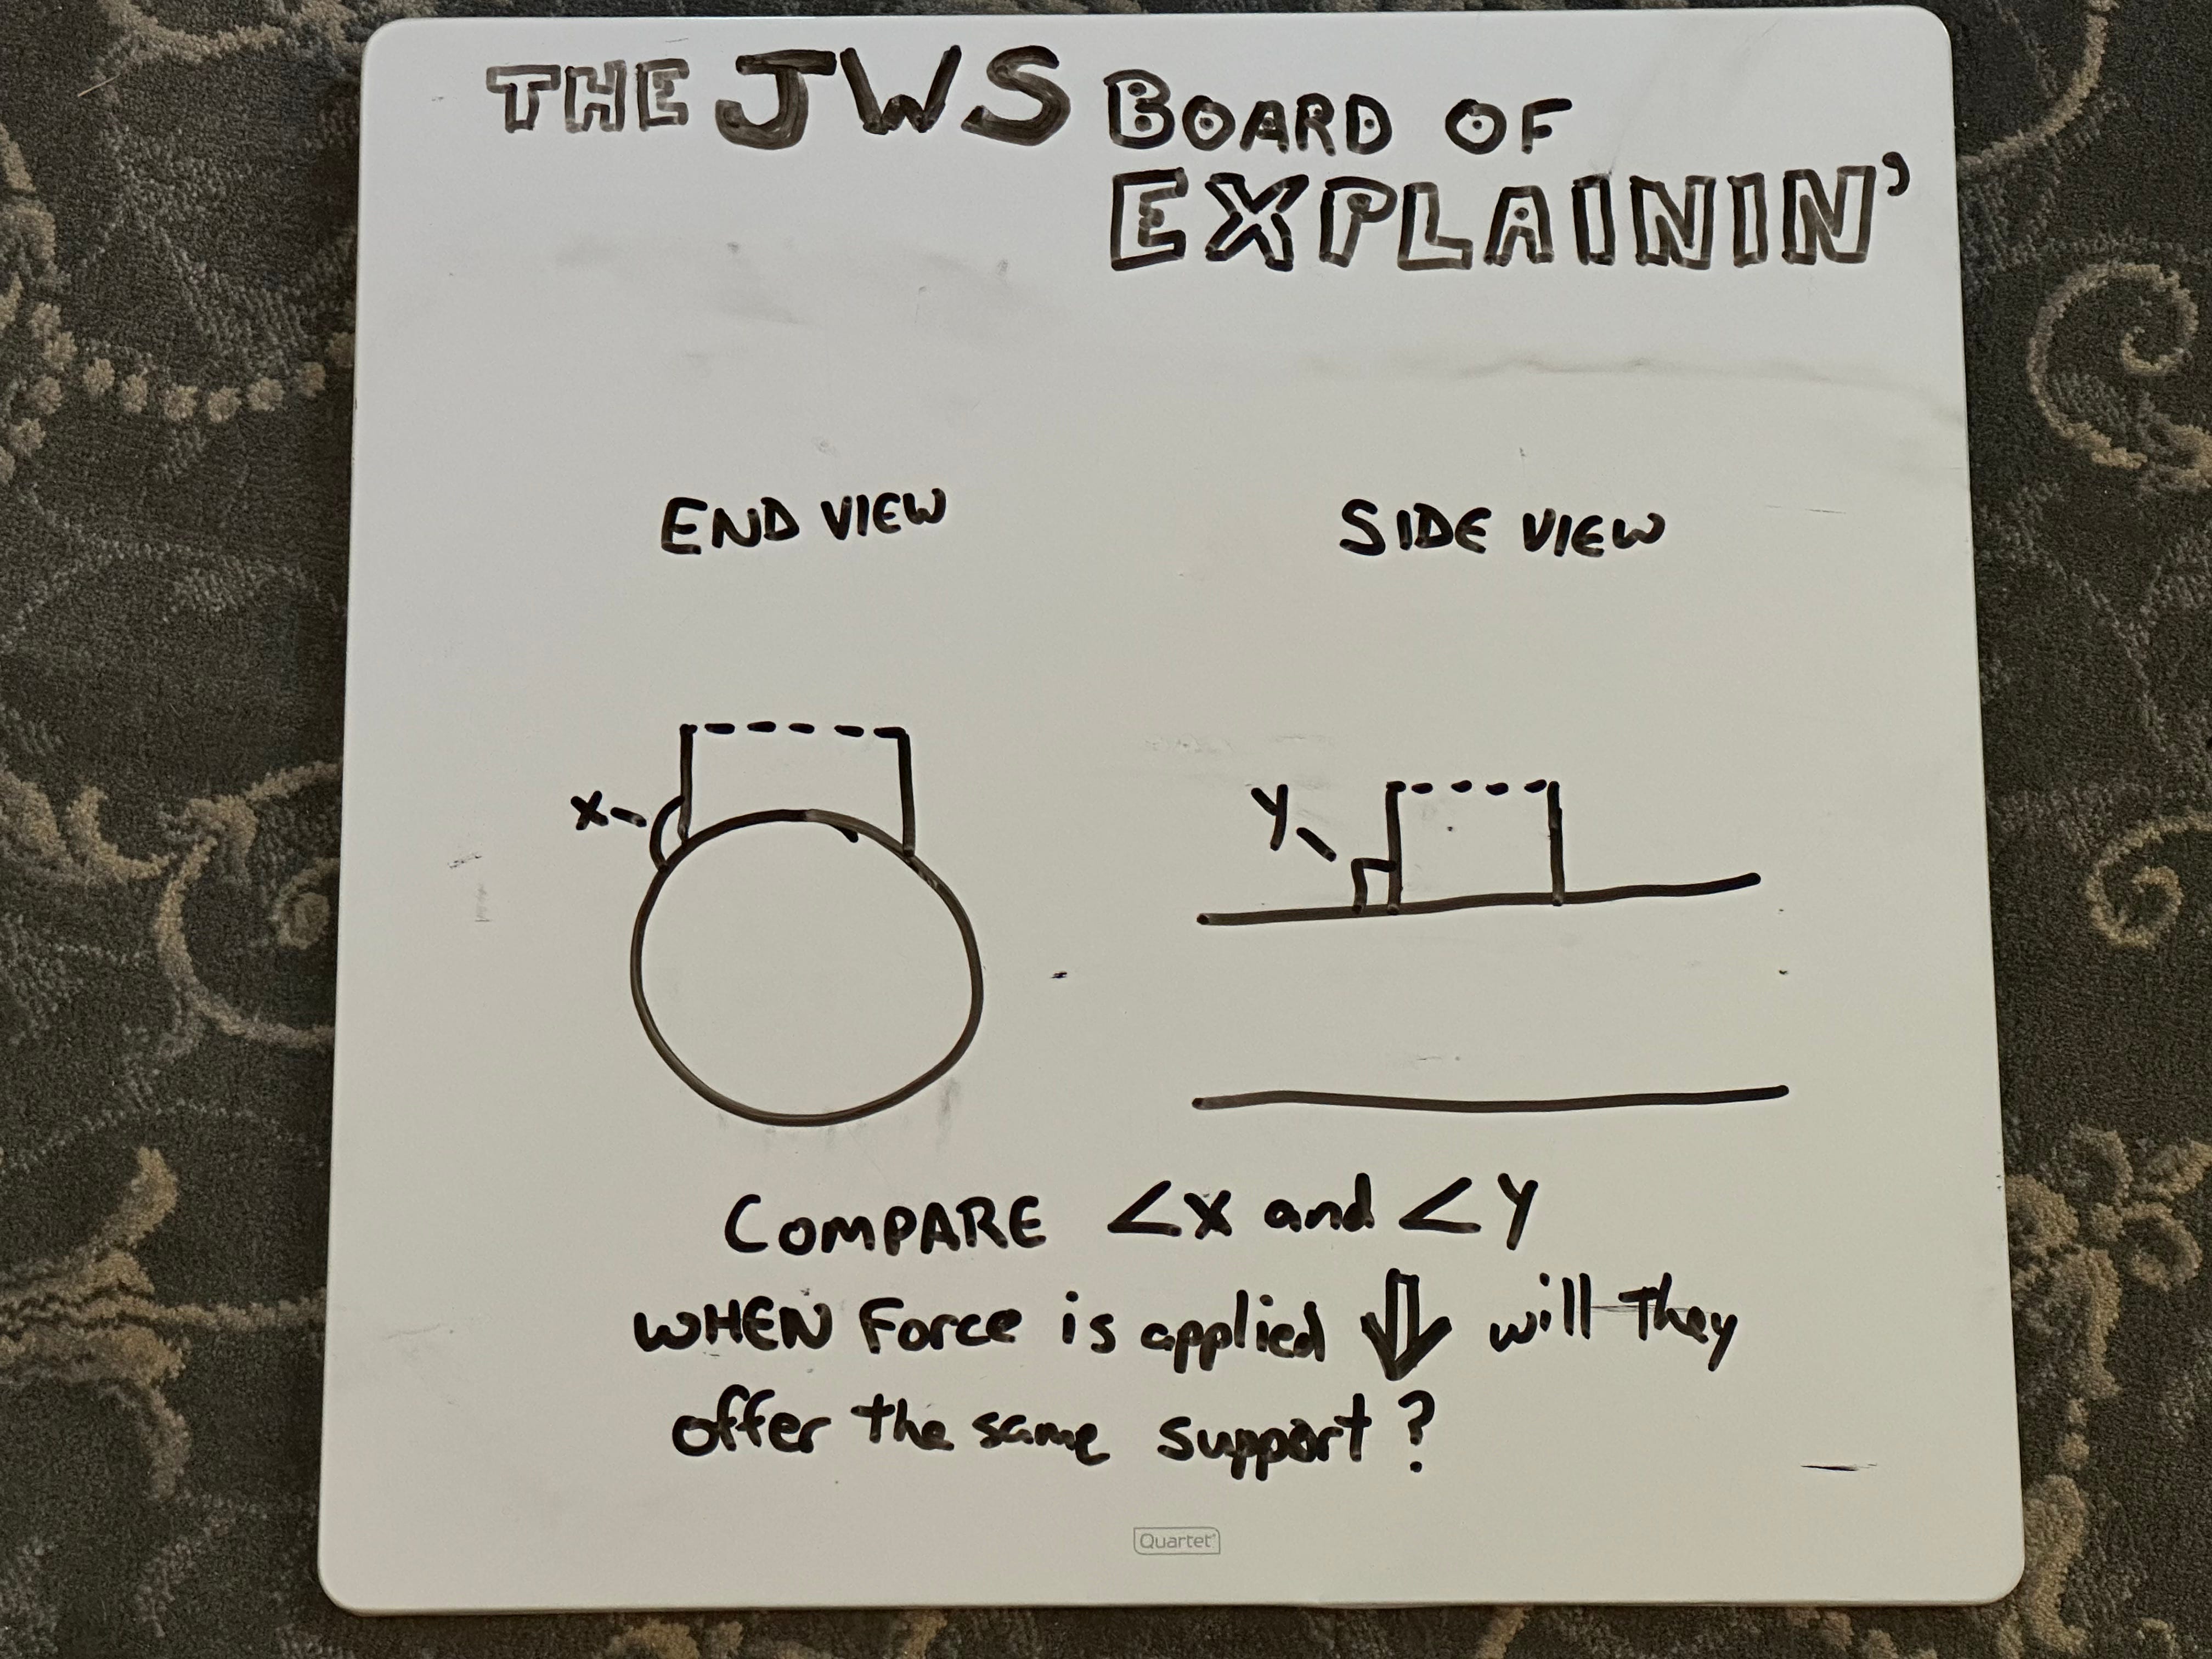
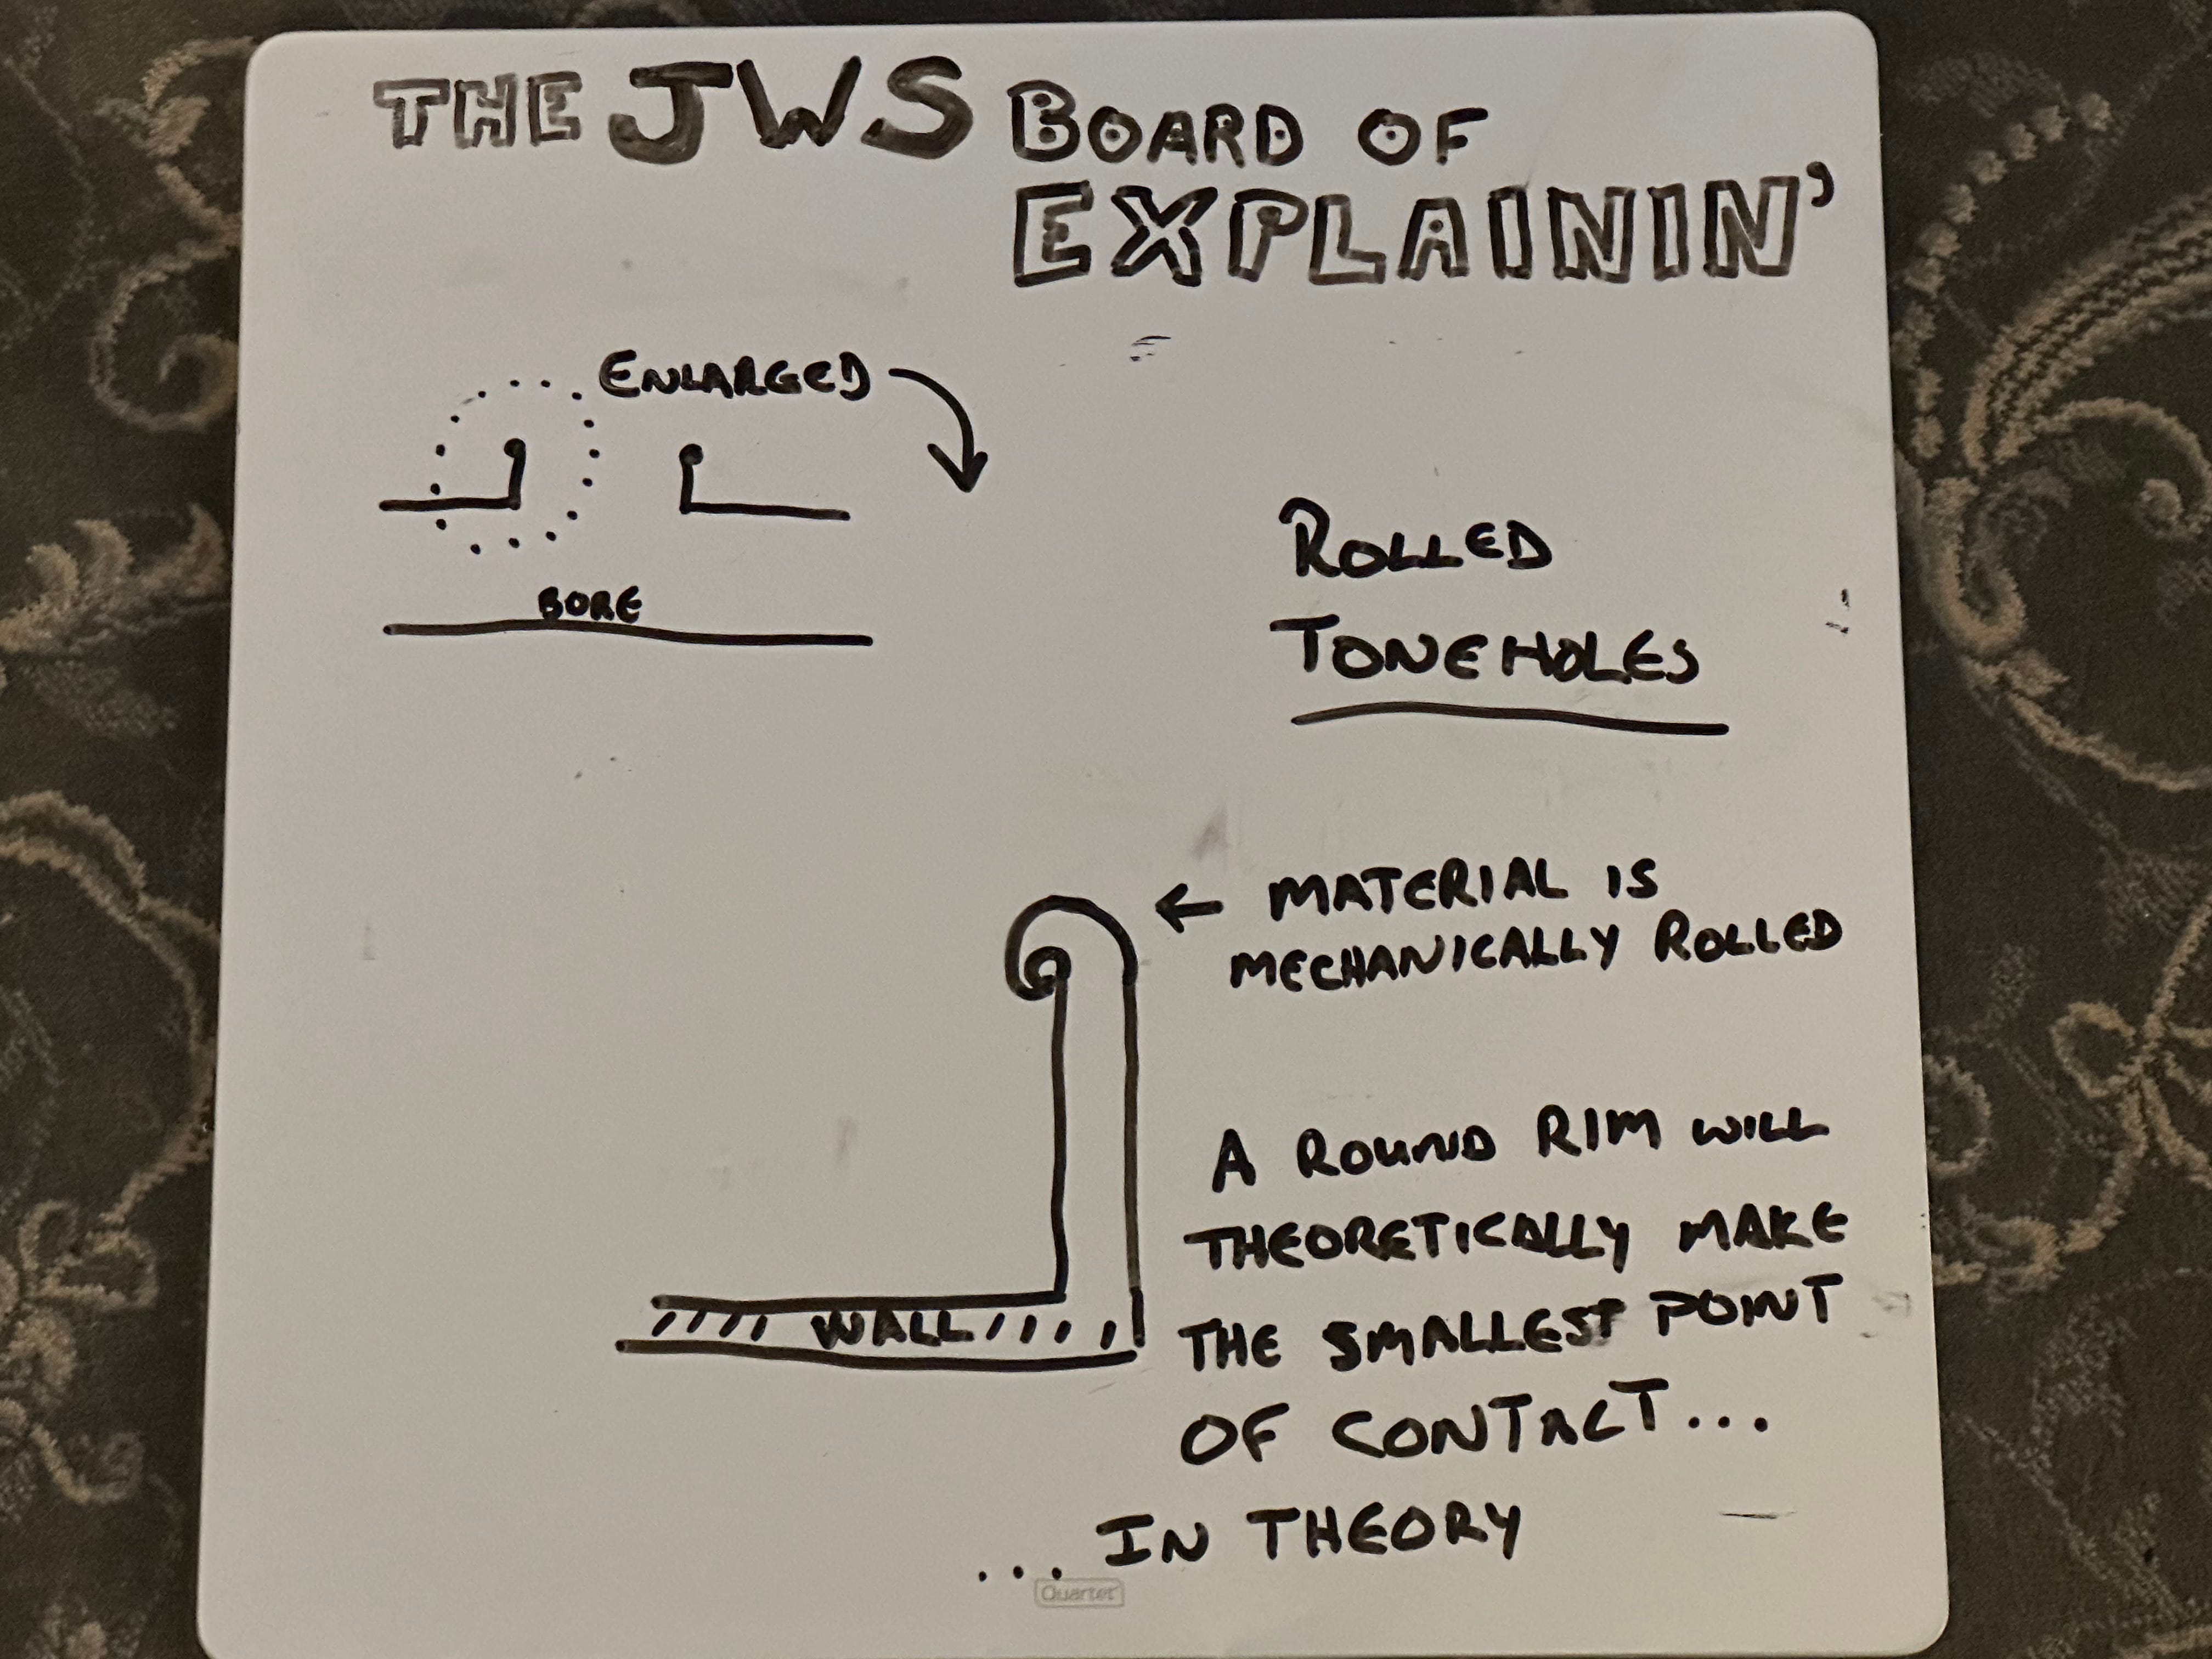
This is most profound in operations where the toneholes are faced and flattened by machine. Study the picture above on the Jeff’s Woodwind Shop Board of Explainin’. Toneholes are mounted on or drawn from round surfaces (body tubes). When pressure is applied to the face of the tonehole by a machine (or heavy handed technician) the body tube is going to flex but the rim of the tonehole does not get “pushed down” (for lack of a better description) uniformly because the walls of the tonehole are meeting the body tube at different angles. The body tube flexes in different amounts and often in different directions based on the angle with which the tonehole meets the body. Then when pressure is released, the body unflexes and the tonehole returns to its prior level of elevation, but with more material removed from different parts of the tonehole face than others—cuz uneven flexing.
Keep in mind, this flexing of the body tube is nothing to worry about. If it could be measured accurately it would be very very small about of movement. However, when you are trying to establish a flat plane, it doesn’t help when the high spots keep ducking.
Technicians preparing toneholes run into this as well. If they are in a hurry, of their abrasive is getting worn out or loaded up, they can press a little harder than they should, flexing the tonehole and the body and making a lot less progress than they had intended.
When I am working on hand made flutes and want to establish a pristine degree of flatness, I try not to apply any more pressure than the weight of my tool, and some tools are forbidden in the final stages because they are too heavy. Beyond that, I have to double check the toneholes near the foot joint when assembled (cuz flexing) and scrutinize all of them approximating playing position. When I am applying similar standards to saxophones, I always do my final super-precise facing with the instrument hanging from the neck strap (cuz flexing).
This degree of obsessiveness is not always warranted nor recommended, but if a technician or maker does seek to establish truly flat toneholes, then this a major variable that is overlooked.
Wood Toneholes
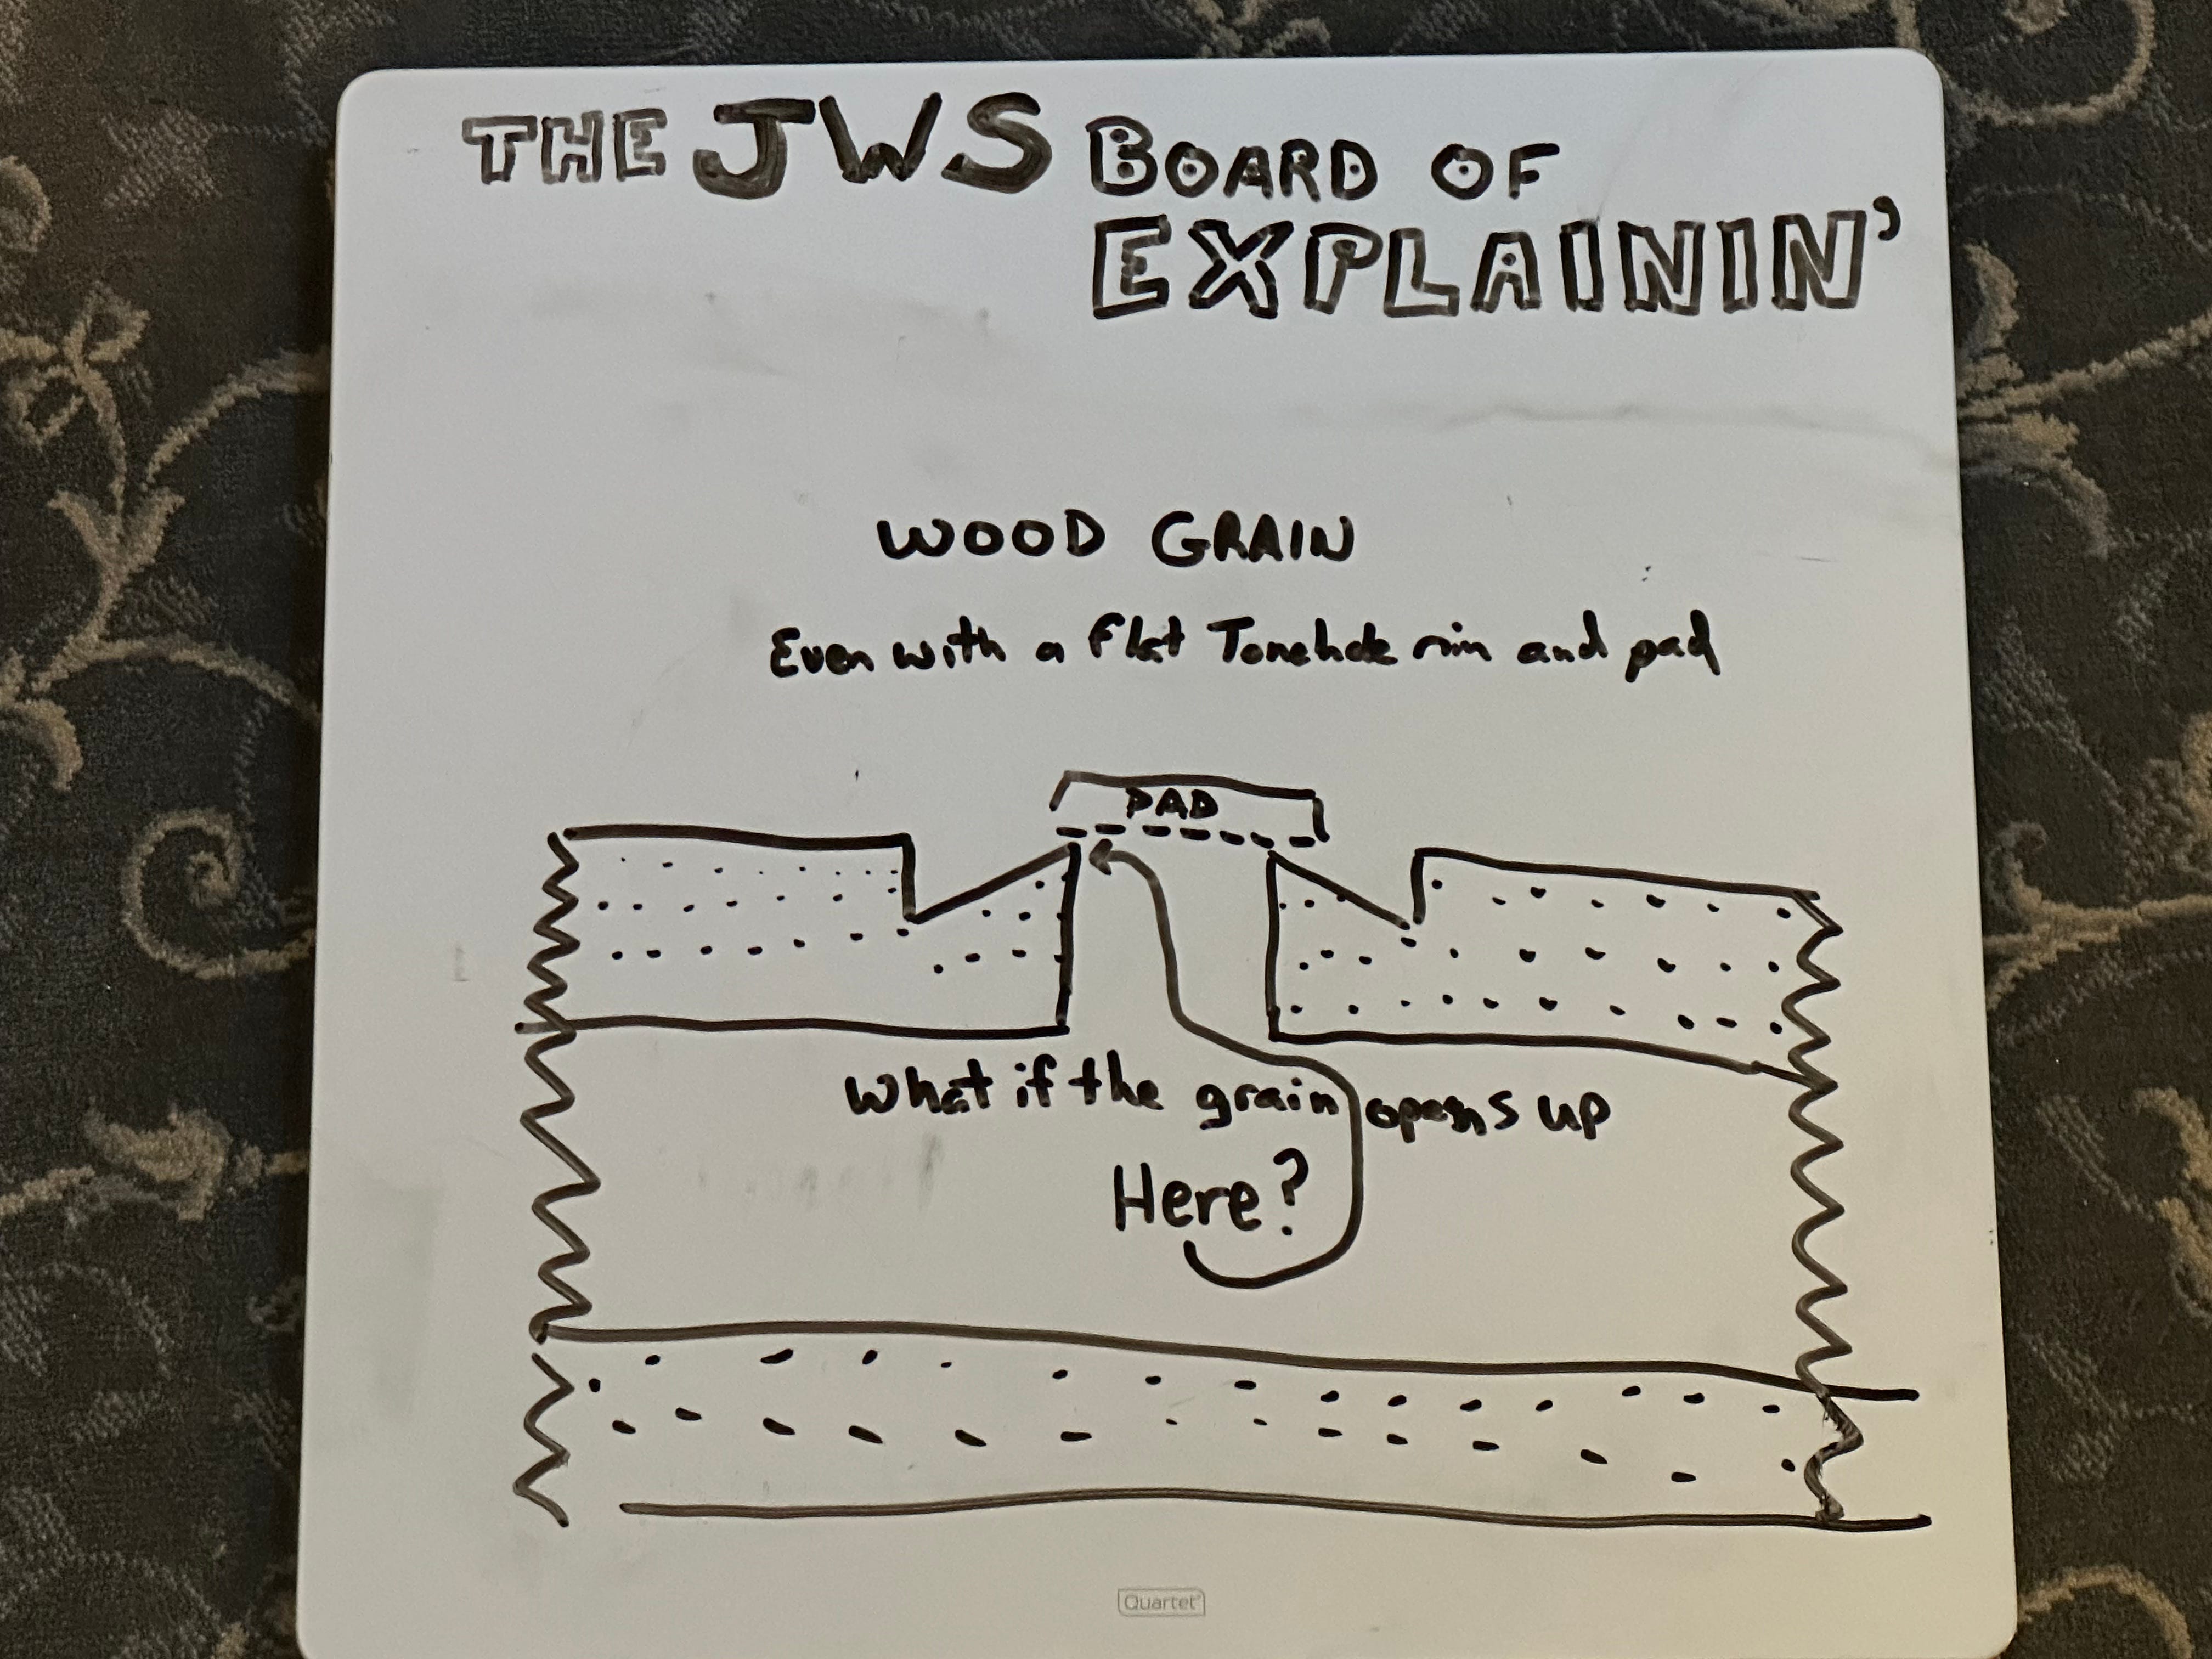
Toneholes on wood instruments provide different challenges. Yes, they still have to be flat, but the big challenge comes from the wood itself and its grain. As we know, the grain of the wood generally runs lengthwise. Wood grain can expand and contract, usually in the presence of moisture, and guess who is really good at putting moisture through a precisely crafted hunk of wood?
Fortunately the tone woods used for most modern instrument are among the most dense woods in the planet and are highly resistant to moisture. Highly resistant is not the same as impervious. If you want impervious, get a plastic instrument. So when the grain inevitably exposes what we call “checks” where the grain is more pronounced, when this happens at or near the rim of a tonehole, it can cause problems.
If the grain check is large enough, or if it borders on being labeled a crack, it doesn’t matter how perfectly flat the tonehole rim is or how well the pad is installed. The air will simply seep out through the void created by the check, bypassing the formerly perfect seal. Sometimes checks can appear on the surface near the tonehole rim, but not cross it and people assume it is ok for now. That check could act as a straw poking through the wood just below the tonehole rim.
If the tonehole is really chewed up, has large unruly hordes of grain checks, or has a crack going through the tonehole, the best durable solution is to bore out the the rim of the tonehole and replace it with a replacement rim. Pictured below is an example of a “replaced” tonehole on a bass clarinet for The United States Army Band I repaired several years ago. I prefer to use black polycarbonate, but technicians use what they are comfortable with, including different types of plastic, ebonite, or a clean piece of wood.

Tonehole shape
When I speak of tonehole shape, I am referring to the rim being either straight or rolled. Rolled toneholes are fairly commonplace on flutes. For over 100 years it is how most drawn toneholes have been finished. Among saxophonists, however, rolled toneholes have developed some sort of cult status where they exude magical powers of some sort.
The straight deal with rolled toneholes are they are a pain in the butt to work with if you are going for any sort of lasting precision. If you want your instrument to be preserved in original 1932 condition and not have the toneholes improved, then abandon all hope of the instrument being up to modern playability standards.
I say this because rolled toneholes are NEVER flat. More on that soon…
The theory of how rolled toneholes are supposed to interact with the pad is worthy of embracing. Remember from high school geometry (or calculus) class that a circle will have tangent points perpendicular to any radius, and that those tangent points are infinitely small. An infinitely small contact point on the the tonehole is the holy grail of woodwind padding. The problem is creating the rolls on the toneholes takes a good deal of mechanical force, and as discussed earlier, such forces on the toneholes will create flex in the body and the finished rolled rims will not be on a flat plane.
The rolled toneholes not being flat was not a huge deal back in the days of mercury treated felt. In fact, if not for these toxic pads, I am convinced there would have been a lot more turn over of instruments and models or brands that were written off as lemons. In order to pad an instrument with rolled toneholes using modern pads, the toneholes have got to be flat, at least a lot flatter than the factory specs. This means to create the flat plane, the infinitely small tangent point of contact will be destroyed. There is no way around this.
Rim width
I will not talk much on this because it can get very technical and detailed in a hurry (yes, even more technical than I have been thus far). As I mentioned just a moment ago, a curved tonehole surface can offer an infinitely small contact point. This is a good thing and it transfers over to non-rolled toneholes as well. On straight toneholes this means physically reducing the rim of the tonehole, often with the help of special tooling.
There is a myth floating around out there that narrow tonehole rims will cut pad skins. Poorly prepared toneholes can cut pad skins. Narrower rims with less contact area can actually allow the player to get a positive seal with less finger pressure. This allows for improved technique, less muscle exertion, and more crisp response. Plus, it is so so SO much easier to install pads on a narrow tonehole rim than a wide one.
On handmade flutes with soldered toneholes my goal is a contact rim approaching 0.003”. Rolled toneholes I aim for the range of 0.010-0.015”. Saxophones I aim for 0.015-0.020” wide. Wood instrument can be a lot more challenging to establish a uniform narrow rim, particularly if the wood is not cooperative. My goal on soprano clarinets, oboes, and piccolos is in the 0.005” range. A standard post-it note is 0.004” thick.
Why does all this matter?
In the last few decades, the precision of making woodwinds has really improved dramatically. What used to be almost exclusively hand work done with extreme precision by career artisans is more frequently mechanized for consistency. In order for the mechanized processes to make sense, the old traditional standard of fingers or pads squishing into toneholes just the right amount is disappearing. Great advances have been made in [ad technology and design, but these pad advancements are limited if improvements are not made in the proper finishing of toneholes.
The proper understanding, treatment, and preparation of toneholes is one of the most overlooked details in instrument repair and set-up. It is a process that, for the most part, only needs to be done once and once it is established as a bench mark can be used as a datum to improve standards in other aspects of woodwind repair and set-up. The proper resurfacing of toneholes can be an art in itself, as can pad installation. For the analytical and mechanically minded people, the way the mechanisms work on woodwinds may be of interest. Watch for next week’s article for that topic.

At the woodwindfixer’s bench is a publication of Jeff’s Woodwind Shop, a professional woodwind repair shop in Baltimore, MD. Jeff now has his 2026 overhaul schedule mapped out. There are only 10 overhaul spots for all of 2026 and several have been claimed already. Visit www.woodwindfixer.com to get in touch.