

Before I begin this part in the All About Pads series, an admission of an error. In part 1, which focused on the history of pads, I wrote a little about the design and function of instruments in the 18th century and earlier. A friend who is an expert in the field of Baroque instruments pointed out to me that my assertions in that section were way off in left field and probably not in the ball park at all. I wholeheartedly and humbly thank him for pointing out my error in relying on hazy and non-descript memories from my conservatory days of more than 3 decades ago. My domain of instrumental knowledge resides in the 19th and 20th century developments of engineering and design, so I am confident in the foundation of what I wrote about the history of pads. However, I want to put forward factual information, even if it is not the main focus of the topic. I do regret my errors in the publishing of incorrect information about certain eras of instruments. I will endeavor to not make similar errors in the future.
-JD
What are engineered pads?
The term “engineered pads” is something I began using quite some time ago. I do not know if it came out of my head or if I heard it mentioned by someone else, but it is an apt descriptor for this class of pads. An engineered pad is one that has support and structural components that are specific to the intended function of that pad and exceed the expected design components of the bladder pad or the slab pad I have described in parts 2 & 3. Something else has been specifically designed and fabricated (indeed, engineered) to make the pad function with the qualities intended by the maker.
A bladder pad is a cushion core —usually felt— supported by a backer material —usually cardstock— and wrapped in skin. Simply changing the internal cushion to a different material, or layers of different materials does not make it an engineered pad. Changing the card stock backer to a titanium disc does not make it an engineered pad.
Likewise, a slab pad could be a single material of leather or cork, or it could be a synthetic foam in single or multiple layers. There could be a backer material or not. If the material that seals against the toenhole is responsible for both the seal and the dimensional integrity of the pad, it is a slab pad.
Engineered pads are far more complex, but at the same time can be remarkably simple in concept.
How did we get to the need for Engineered Pads?
To put it simply, the 19th century technology of bladder pads, and the older technology of slab pads had reached their practical limits as instrument making, aided by modern machining technology, became more precise and the expectations of players and demands of composers continued to push the limits of what could be done. Even with space age materials, polymers, and novel twists on installation techniques, the old pad models had reached their limits.
One commonality for pads of all types is their relation to the geometry of the instrument. The way most woodwind keys function is the key moves in an arc and a planar surface meets the matching planar surface of the tonehole. In between these two parallel planar surfaces is the pad. If the pad material is too thick or too thin, the key will either over- or under-rotate and the planar surfaces will not meet.
The pad geometry question was one that was understood quite quickly in the development of instrument making, especial when industrial mass production became the norm for so many instruments. Instrument makers would sometimes make their own pads to the specifications their key designs required, but soon there were dedicated pad makers providing pads of the proper geometry to the wider instrument making industry.
Early Engineered Pads
Arguably, one of the first engineered pads was the Seaman piccolo pad. In reality, it was an extremely precise bladder pad, but I will describe it shortly. The piccolo maker Roy Seaman teamed up with Miles Zentner, long time piccolo soloist with the Los Angeles Philharmonic, to make the Zentner Piccolo. Roy had an idea for an extremely precise pad that would not succumb to the cushion instability and collapse many bladder pads of the time were confronted with following the removal of mercury from the felt supply.
Felt was always a bit of a moving target. Wool fibers can absorb 30% of their weight in water and still feel dry. This applies to direct moisture such as rain (that one can avoid), or passive moisture like atmospheric humidity (that one cannot avoid). One can imagine if a mass of wool fibers in felted form is absorbing 30% of its weight in moisture on Monday and shedding all or most of it by Friday, there is going to be dimensional change as well. On woodwind instruments, the smaller the instrument, the more profoundly small flaws can impact how the instrument plays. Just think of how fussy a piccolo could be under these constantly changing conditions and how tenaciously skilled the players of the mid-20th century must have been to produce the results they did.
In conversations I had with Miles Zentner in his later years, he spoke about how many piccolo players at the time were turning to cork pads on their instruments. Cork was far more stable than felt pads, but he did not care for the tone quality cork pads produced. The Seaman pad offered the stability of cork, only with less key noise, and the tone quality closer to that of felt pads. Plus, the pads could be made to a precise geometry within 0.004” of thickness, allowing Zentner and Seaman to reliably design their keywork around the pads.
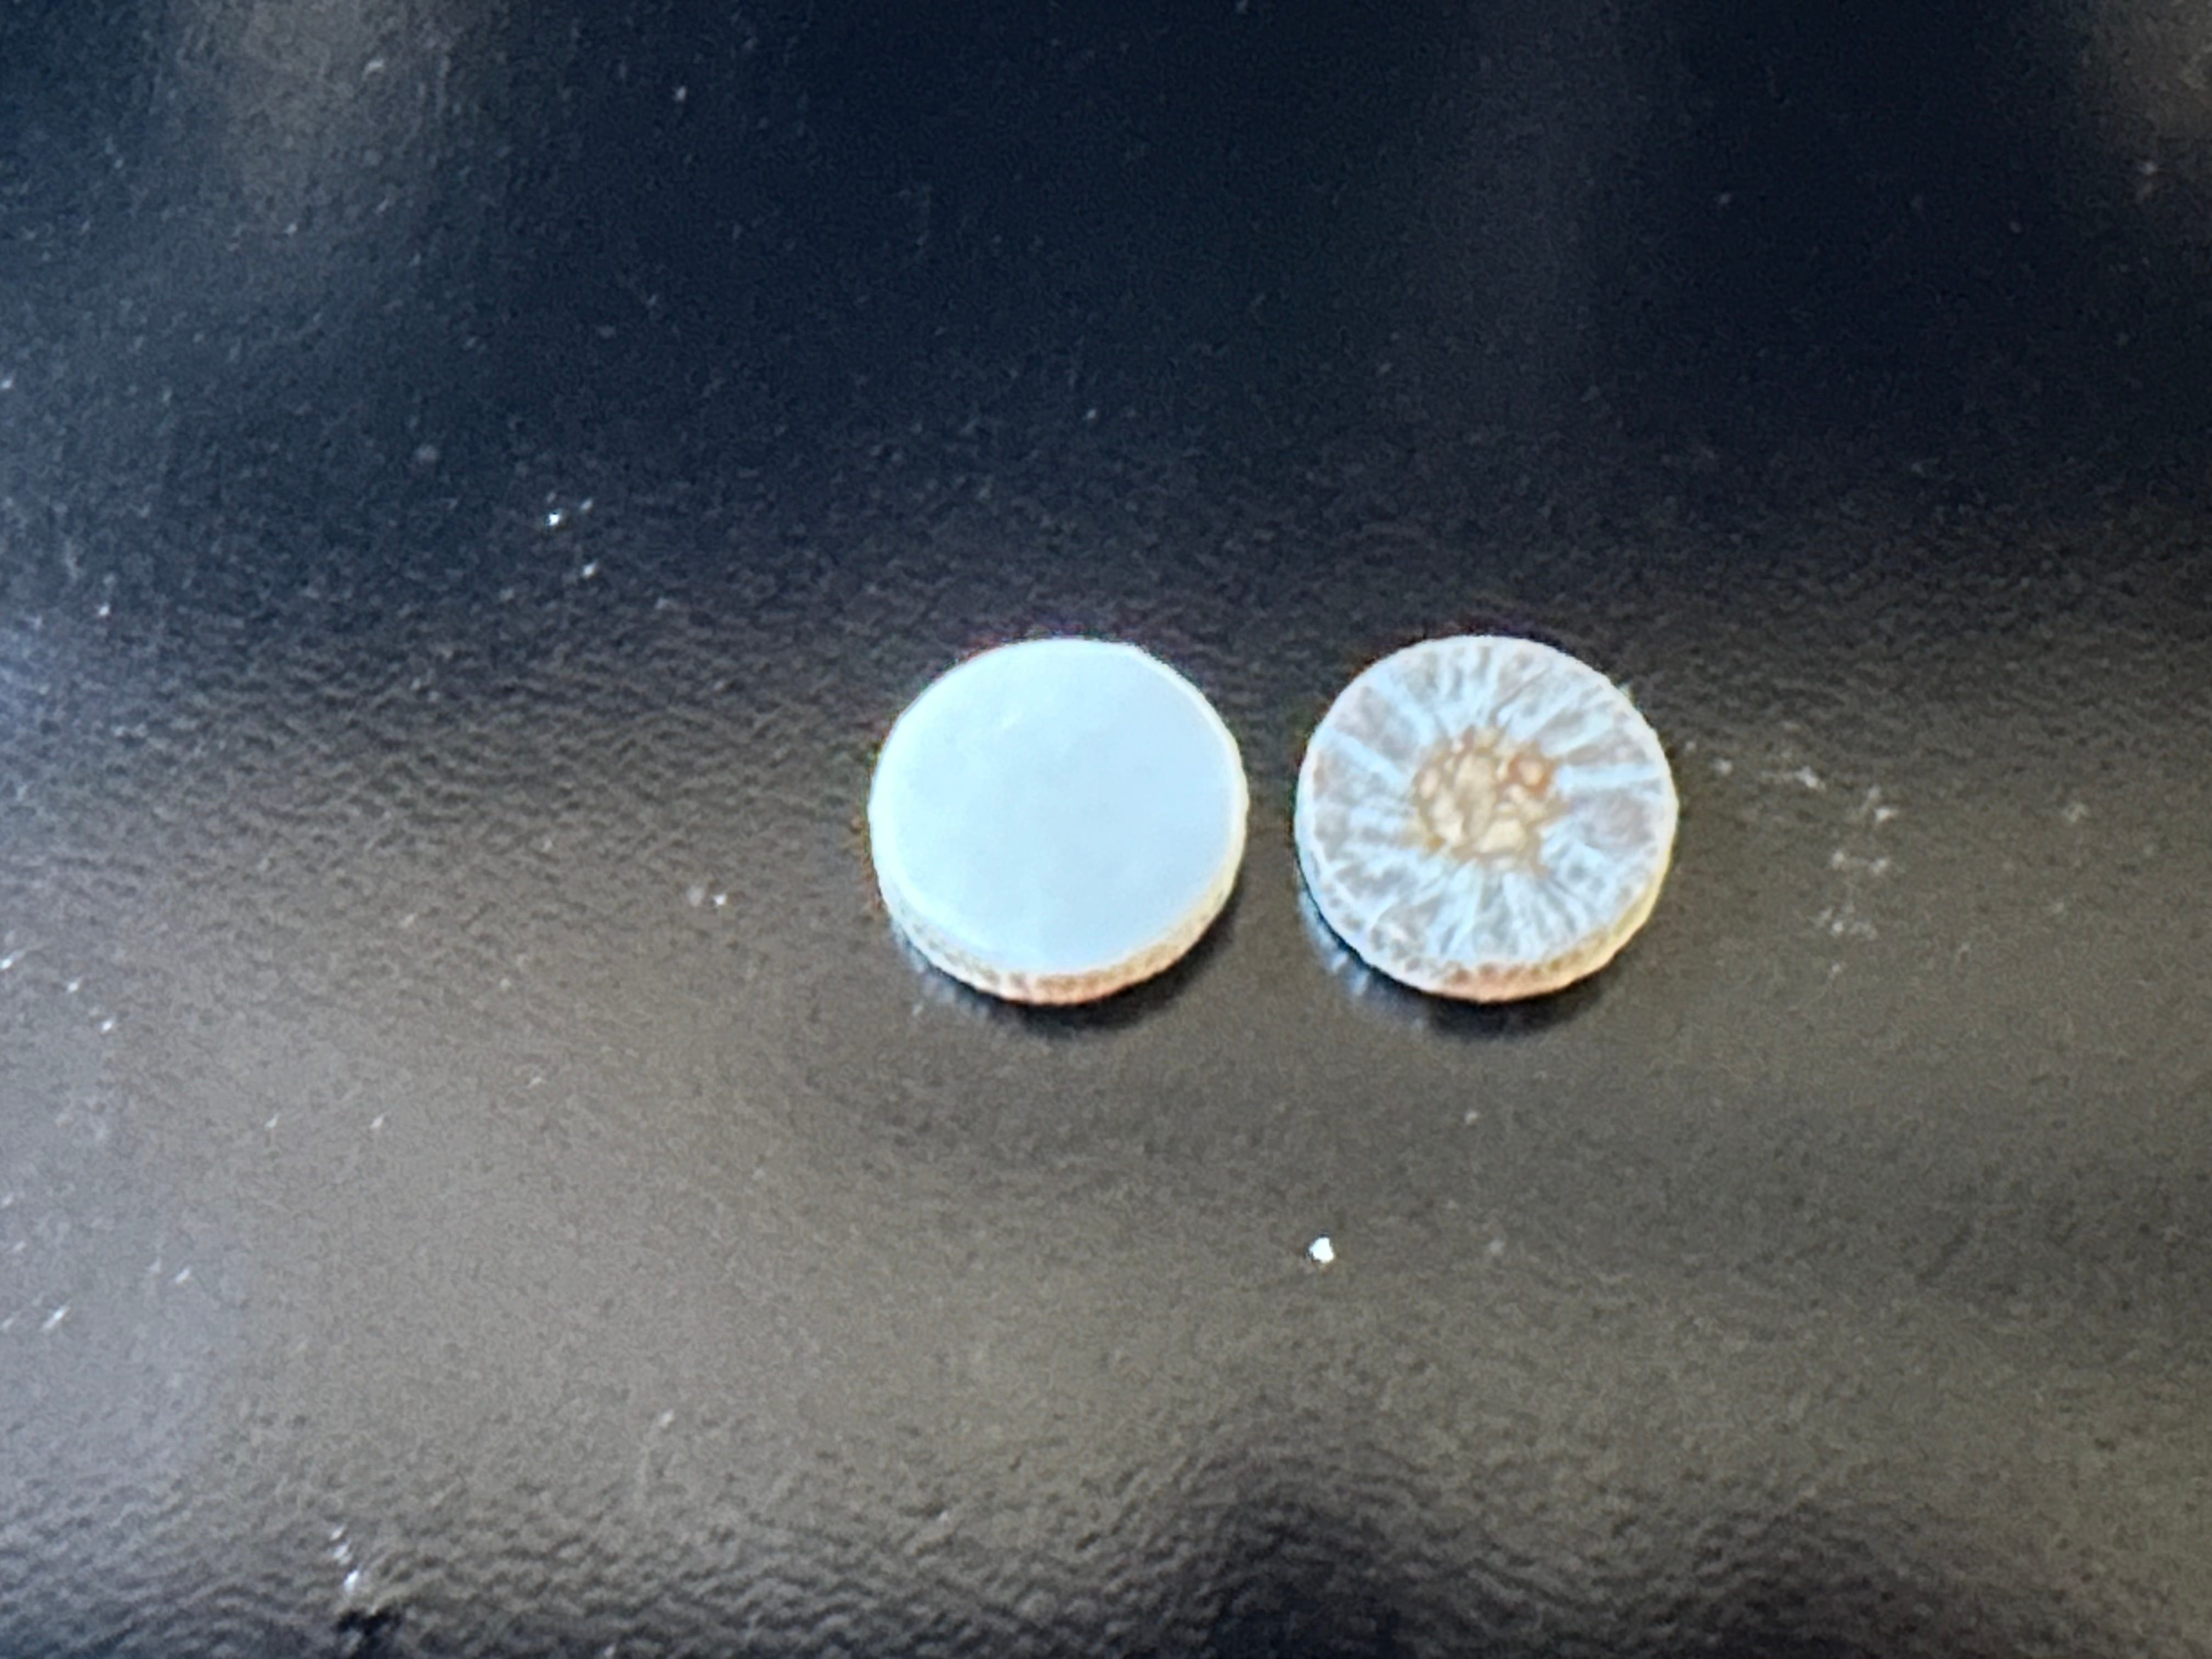
The Seaman pads were essentially stacks of paper. Everyone has probably picked up a stack of copier or printer paper to feed a machine and is familiar with how firm even a stack of 10 or 20 sheets of paper is. That was the foundation of the Seaman pad. The base was a disc of composite cork, the core was a stack of paper (I have never counted the layers), on top of the paper was a layer of softer tissue-like paper, and the pad was wrapped in a traditional covering of goldbeater’s skin.
The Seaman pads are no longer being made, which is really too bad. They were a joy to work with and spoiled technicians and players alike with their ease of installation and performance.
A Paradigm Shift—David Straubinger
The real advent of the engineered pad came about with the realization by some that the whole playbook on pad installation had to be thrown out. For a decades and perhaps centuries, the pinnacle of precision in the musical instrument making resided in the world of hand made flutes. The flute is the most exhaustively studied of the woodwinds and even though the term “hand made” may now be considered a misnomer for all of the highly precise mechanized processes involved, the term endures as a general class description of the best of the best instruments made to the greatest degree of precision.
This great precision came with an Achilles heel: The pads. Great attention and focus was applied to different installation techniques and methods, some that were awarded patents. All of these methods had the same failure point, which was they relied on “seating” the pads against the tonehole. Seating the pad meant compression of the cushion material. Compressing the cushion material in turn meant stretching the skin covering. Over time the cushion material would decompress (remember, no mercury to help it stay put). Since the key travels in an arc and the amount of force differs depending on the distance from the fulcrum, there is variable force applied to the pad face. When the cushion inevitably decompresses, it does not decompress evenly because the original force and resulting compression was uneven to begin with.
A Juilliard-trained oboist named David Straubinger recognized this mechanical and dimensional failing and created a new method for installing flute pads based around his ultra-precise pad design.
From David Straubinger’s 1994 Patent #5,717,151 for the installation method:
“Because the compression is temporary, the felt will gradually return to its original position and as a result, upon closing, the pad will hit the tone hole surface closest to the hinge position of the key. In order to completely seal the tone hole, additional pressure will be required. If heat is used on the pad surface during the adjustment, the pad's skin surface can become permanently stretched causing it to remain momentarily attached to the tone hole surface as the pad is released causing unwanted noise.
None of the commonly used methods for aligning the pad over the tone hole can be carried out quickly and at a low cost to provide an accurate and long lasting seal which can be formed without unwanted noise. The methods employed are a compromise between performance required of the instrument and the amount of labor required to align the pads.”
Up to this time (late 1980’s-early 1990’s), instrument makers and technicians alike were determined to find methods for pad installation that gave consistent results, were fast, and did not require an overwhelming degree of skill to apply. There is a saying in many skilled hand-work fields such as instrument repair: “Done fast; Done cheap; Done right: Pick two.” Instrument makers across the spectrum were bound and determined to have all three through creating easy low skill processes. Some in the flute making community recognized that ambition as quixotic. Instead, the refined skill to install pads should equal or surpass the skills employed to make the instrument rather than being dumbed down. As with any skill, speed and proficiency could be gained, but a new process needed to be adhered to for the intended results.
David recognized that the weakest and most imperfect part of the system of a hand made flute (or any well-made woodwind) was the pads. If you have spent all of the research and labor and craftsmanship—cost and time and skill—to make this instrument at the pinnacle of precision, why try to do the pads on the cheap as an afterthought? The proof of the merits of the proper installation, however, are in the results. If the goal is an instant seal when a key is depressed at the lightest degree, and a seal that is reliable the same way despite changing temperature or humidity over weeks or months, a Straubinger pad installed faithfully to David’s process is without equal.
The Straubinger pad design (Patented in 1987) and intended installation centers around the pad skin being pulled taut like a drum head supported by a plastic cup structure. This skin tension is pre-loaded and unwanted distortion is all too easy to introduce. In my experience, having installed Straubinger pads for 20 years, the vast majority of pad failures (skins splitting, instability) can be attributed to a flaw in the installation process. There is very little room for error. When installed properly, Straubinger pads will perform well and hold up to the most rigorous of key popping modern compositions. If not installed properly… well… they won’t.
The Straubinger Pad Design
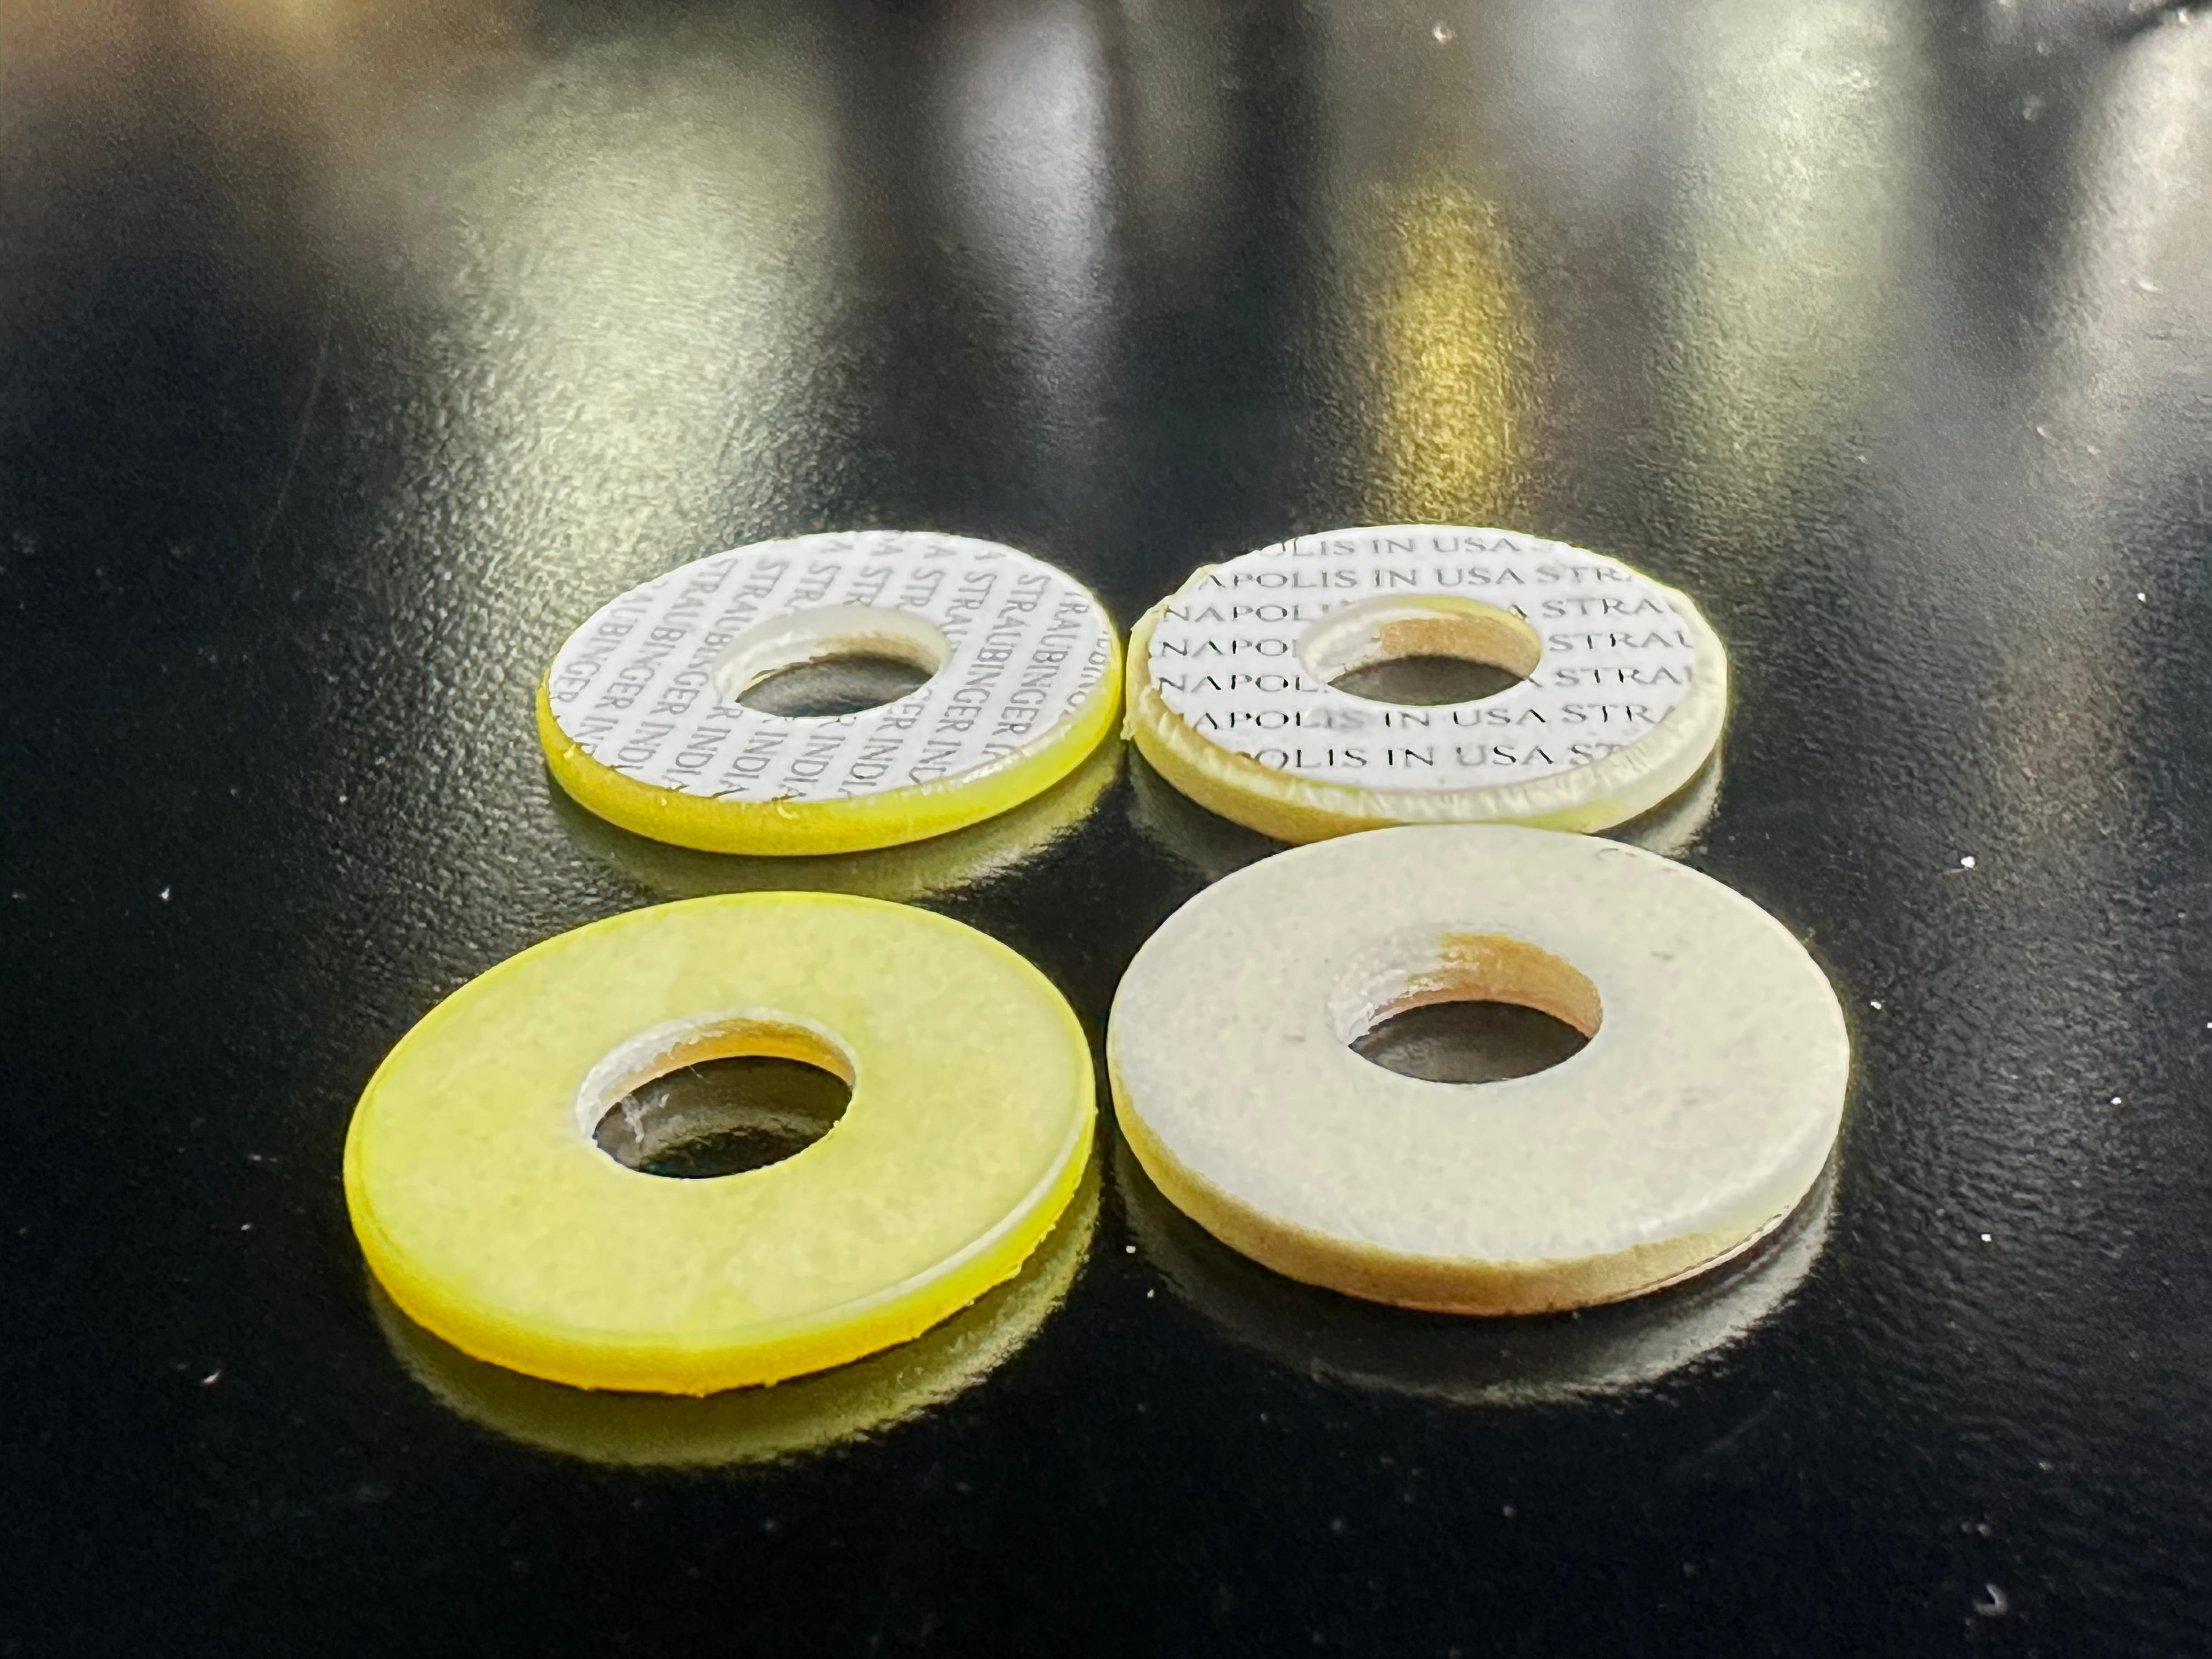
There are several components to the Straubinger pad that are integral to its success. First, David wanted to do away with the fickleness of a felt cushion, so he chose a synthetic material that is inert under temperature or humidity changes. This cushion is housed in a precisely machined plastic cup with very specific and deliberate features (this is important). The pad unit is then wrapped in traditional goldbeater’s skin from a specific source. The skin is the only “natural” part of the pad and, unfortunately, is subject to very slight change from environmental conditions. David trialed many different synthetic materials over his experimenting years but never found anything that behaved as well as the centuries old traditional pad covering.
The other major component of the Straubinger pad is what is known as the stabilizer disc. The stabilizer is a disc of material that is installed in the pad cup to provide a coplanar surface to the tonehole rim parallel at a known distance. The concept of a stabilizer disc is perhaps the most commonly adapted pad installation technique to be used with other types of pads, but it is an idea that was not original. I have a flute restoration project in my shop right now from the 1860’s that has brass stabilizer discs under the pads. This is an example of a sound idea that was employed a century and a half ago, was discarded by makers as unnecessary or too costly of a step, and now has returned.
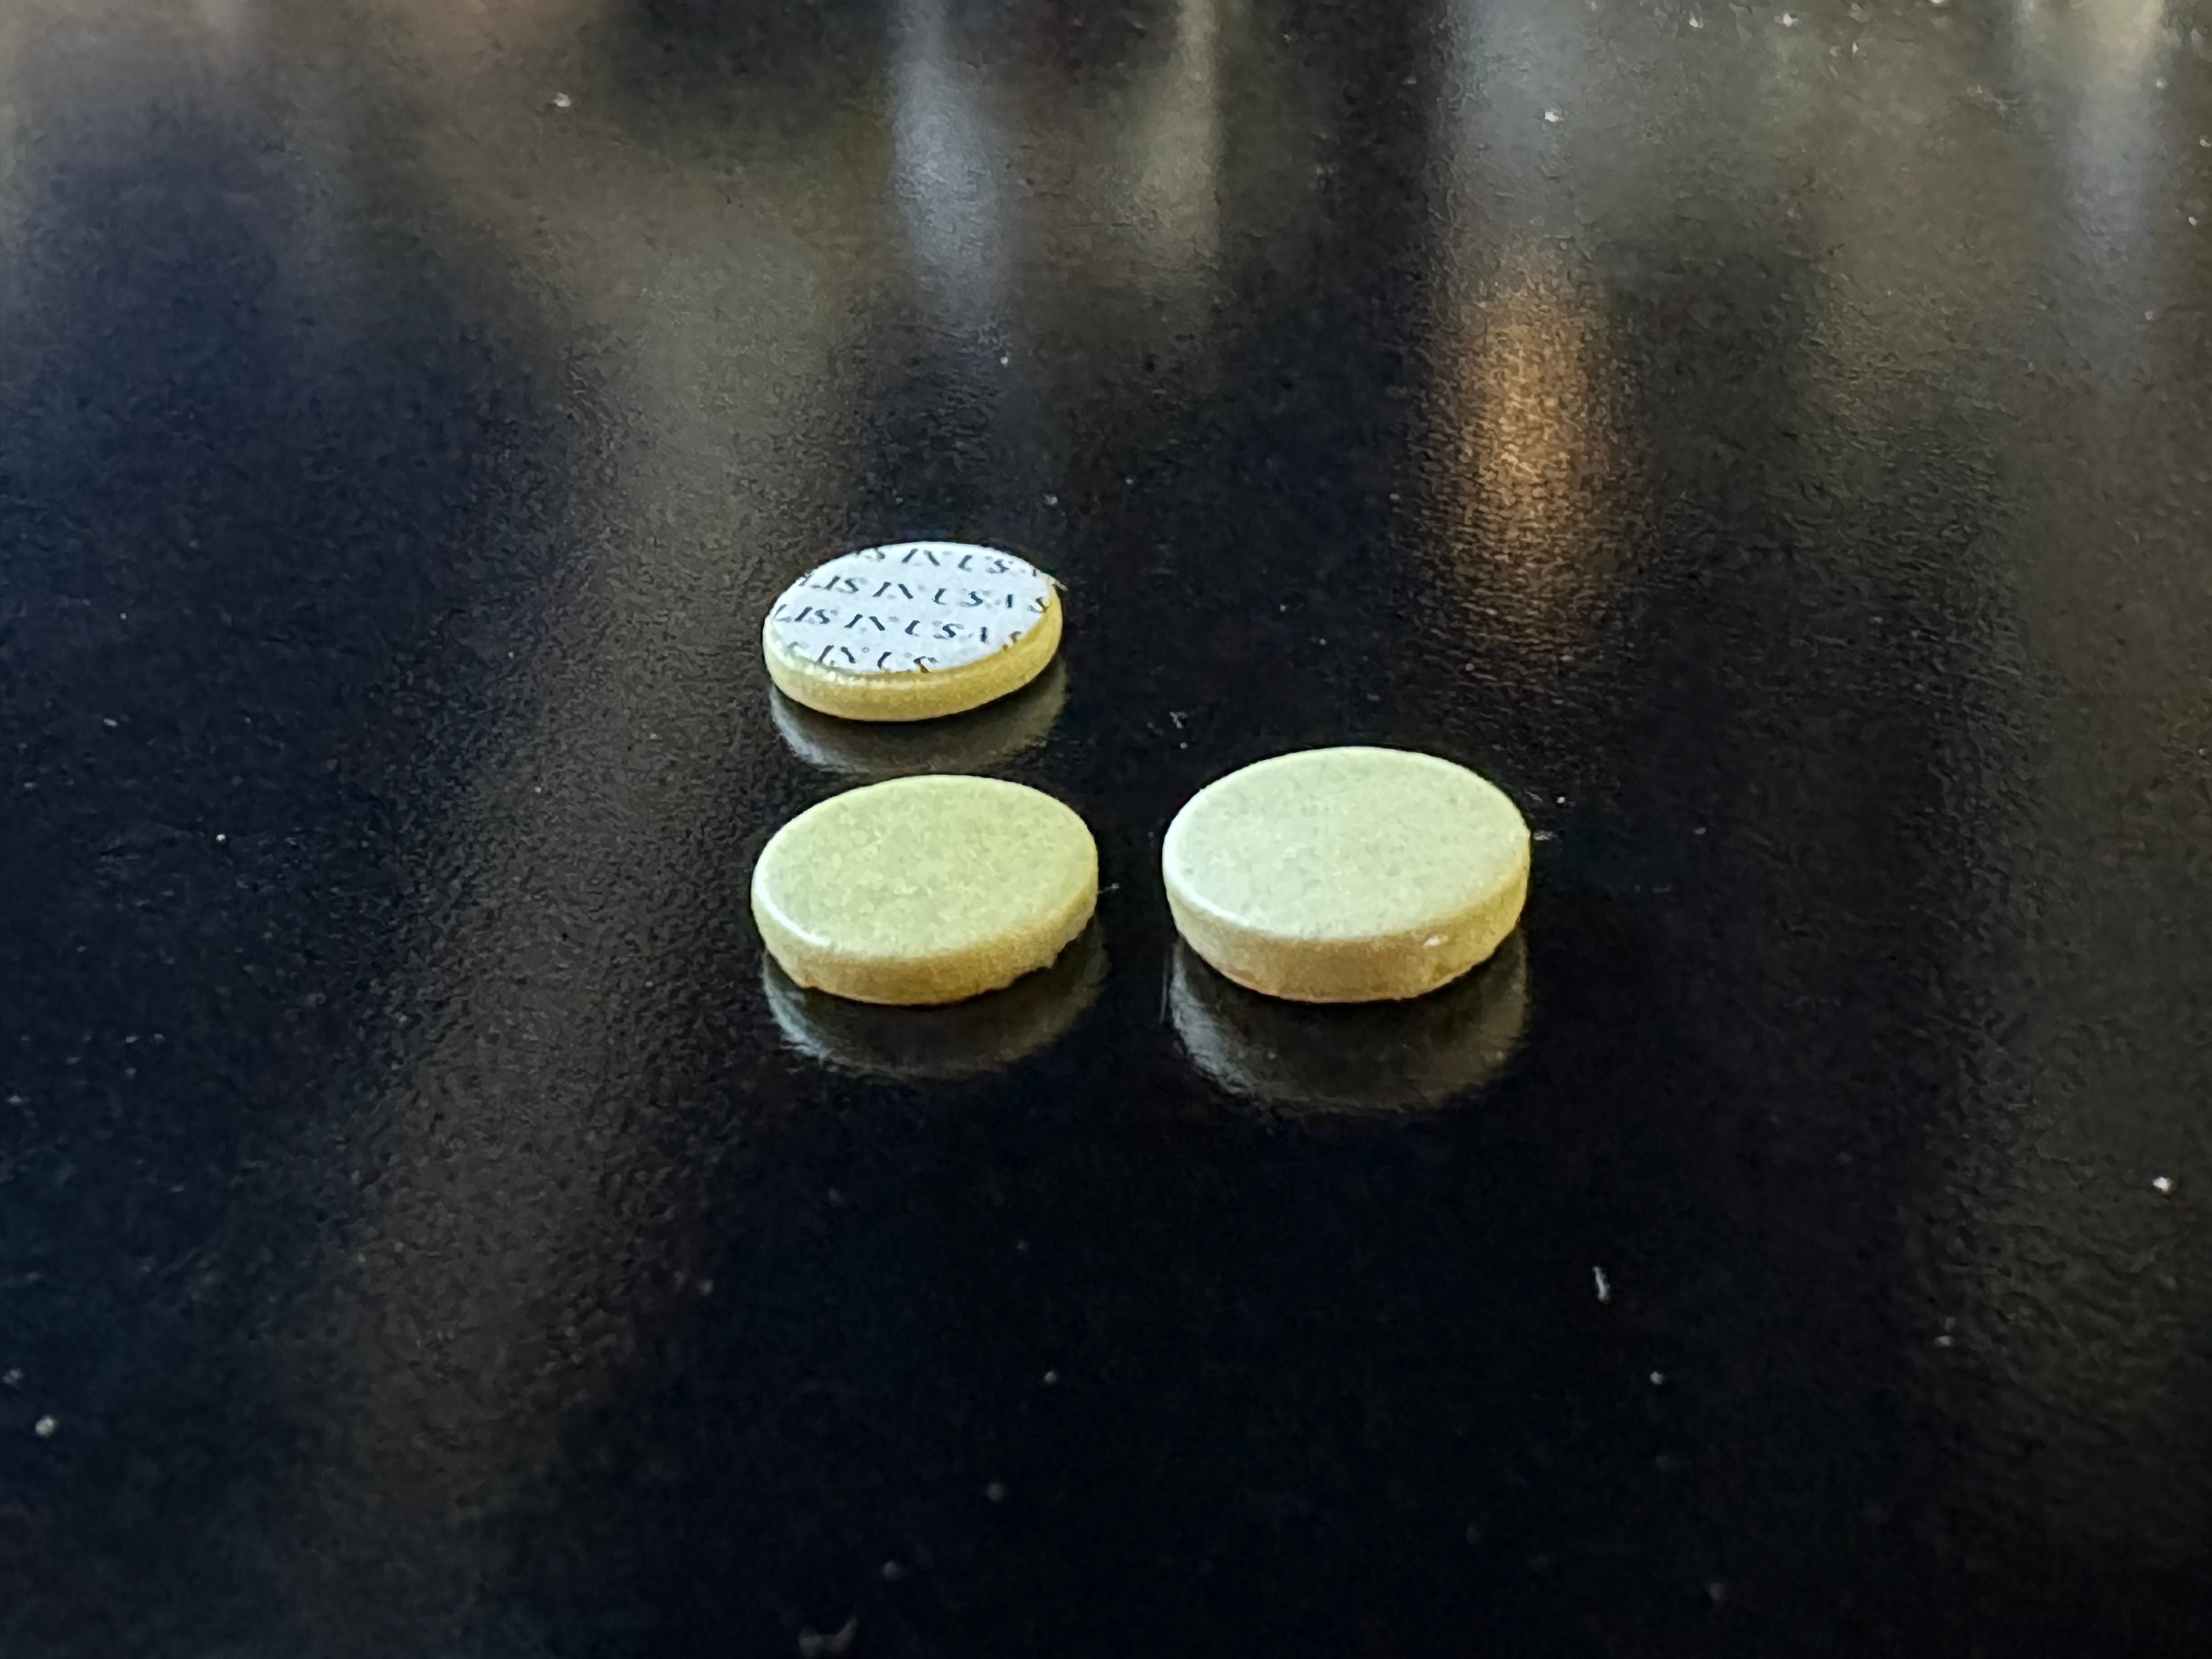
In the early 2000’s, David (with input or assistance from Bickford Brannen) developed the Straubinger Phoenix pad. This was a pad designed to be more forgiving of slight imperfections of tonehole preparation and thus more applicable to a wider array of flutes. Where the original Straubinger pad is quite thin (in the range of 0.055”-0.065”), the Phoenix pad is much closer to the thickness of felt pads many makers use (~0.090”). The Phoenix pad has a similar cup enclosure under the natural skin, but the details of the thickness and installation of the cushion is where the difference is.
The Phoenix pads are my favorite all-around pads for nicer flutes. They are a top level pad suitable for the best flutes and can work well on a wide array of well-made flutes. In addition to appearing in the top model Yamaha flutes, most of Eva Kingma’s hand made alto flutes are now set up with Phoenix pads. Many techs fall into the trap that since they are somewhat interchangeable with felt pads of similar thickness that they can be installed the same way as felt pads. Unlike the original Straubinger pads that have restricted availability, the Phoenix pads are available to techs who have not taken the Straubinger training course, but they definitely function best when installed with similar attention to detail as the original Straubinger pads. Techs who cut corners (knowingly or unknowingly) will decide in a hurry that they do not care for the Phoenix pads.
Since the patent protection on David’s pad design has expired, many similar pads have been found on the market. None of them are as good for one simple reason: none of the copies have duplicated the details of the plastic cup design. Some copied designs have made changes in other features to compensate with mixed results. The omissions or changes are very small, but they do make a huge difference and all that the modifications offer is temporary success based on a less precise pad installation.
David Straubinger also developed a pad for piccolo and oboe, as well as clarinet. These pads have a precisely shaped plastic core, the synthetic cushion, and the wrap of the traditional skin. The piccolo pads are quite popular in the industry. The application of the oboe and clarinet pads are a bit of a sleeper aside from technicians who perform repairs to high end flutes as well as clarinets, like Jeff’s Woodwind Shop.
The Muramatsu Pad
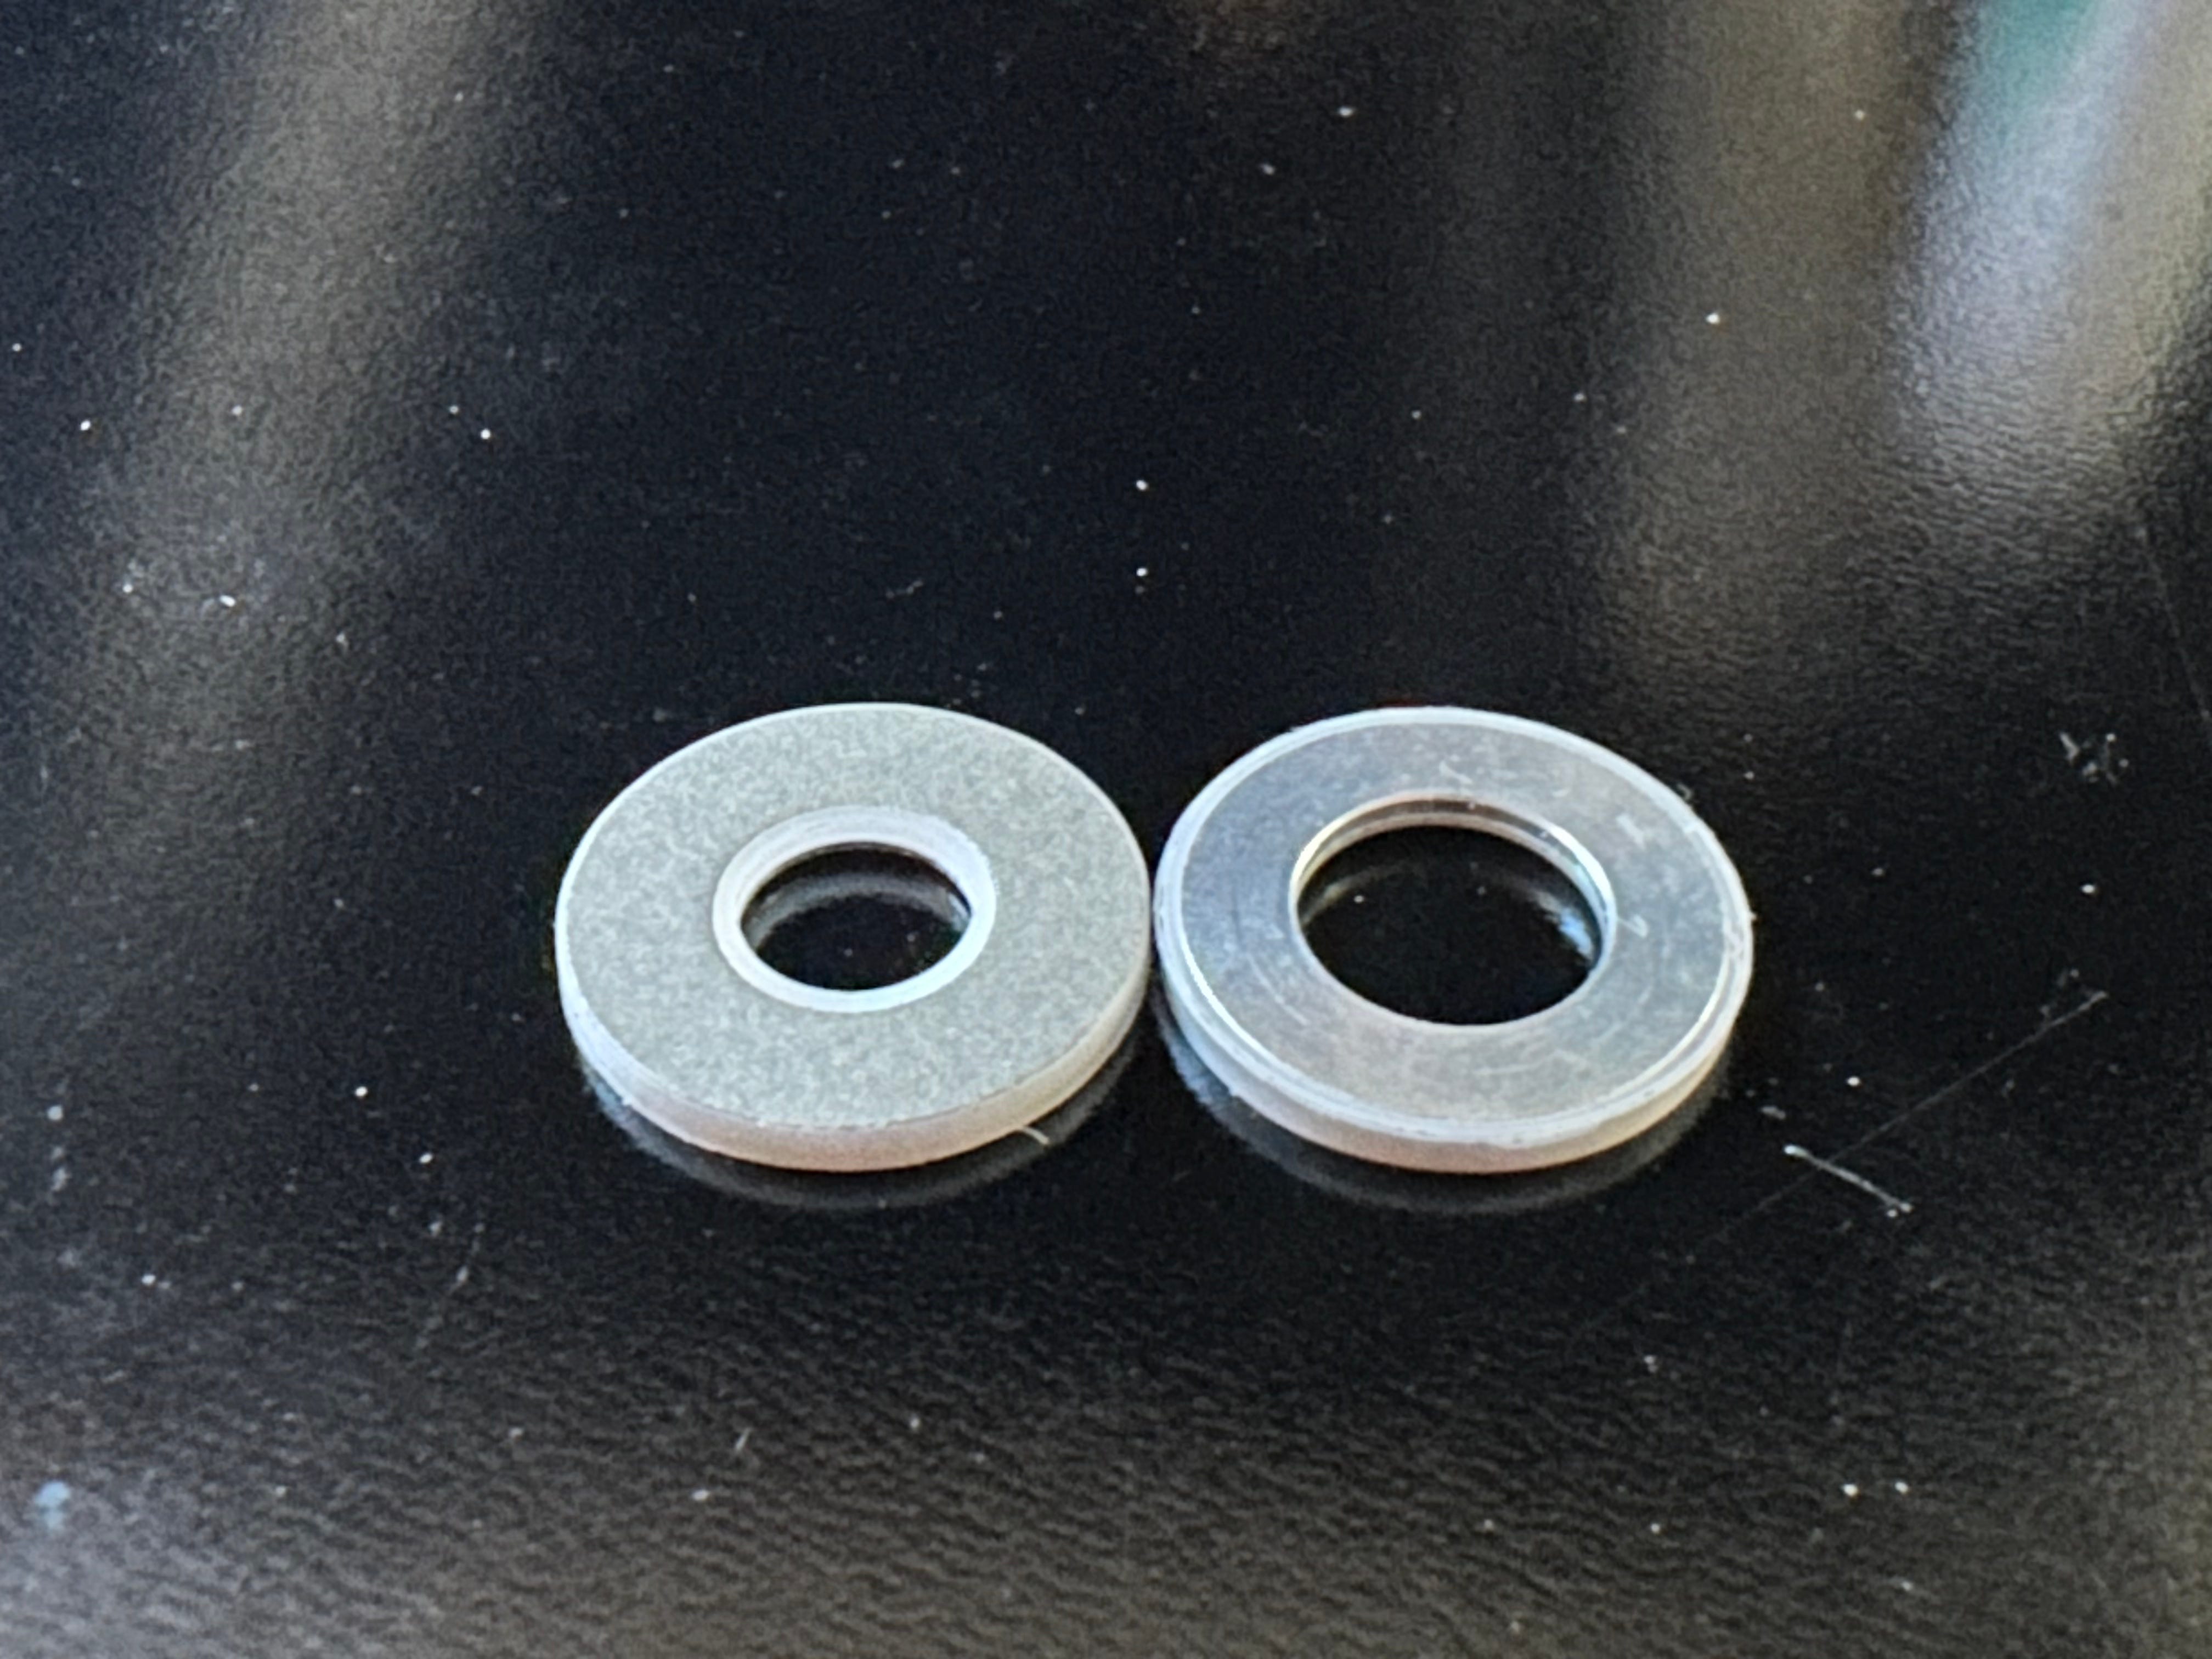
Found predominantly on flutes sold by Muramatsu America, the MA pad (often called the Lotus pad for the appearance of its unique stabilizer unit) is also a marvelously engineered pad system. The pads themselves have evolved from the original patented design to be a metal support cup with a silicone (or similar material) cushion wrapped in a natural skin. One area where the pad design differs from the Straubinger design is the MA pads have a slightly elevated central feature that limits the amount of compression an installer can put on the pad center.

The primary benefit of the MA pad system is the supporting stabilizer. In my professional opinion, the feature that makes it superior to other padding systems is the brass support disc and the threaded pad spud are integrated into one piece. This means the threads the pad screw goes into is always perpendicular to the plane of the stabilizer. With the Straubinger process the threaded pad spud remains connected to the key itself. This is a bit of technical inside baseball nuance I will discuss in detail in a future article for technicians.

The construction and material choices of the MA pads combined with the support system makes these pads probably the toughest and most resilient pads out there. They do rely on the more traditional model (a la bladder pads) to seal against the tonehole compared to the highly precise taut skin of the Straubinger pad, but can be dialed in to a fairly light touch to seal with extreme attention to specific details. The one major disappointment of these pads is they are only made to fit modern Muramatsu flutes, but in that application they have shown some astute design choices that could be applied elsewhere.
JS Gold Pads
Towards the end of the 20th century, a clever machinist, amateur mad scientist, and musician named Jim Schmidt decided to revolutionize the woodwind world by creating a new fingering system for saxophones and flutes that was all chromatically linear. (More about Jim’s inventions here) In order to accomplish this he had to literally make his own instruments, and in that instrument making process he opted to make his own pads too.
Jim went with a pad design that did not have an outer skin covering. His theory was that the pad skin could vibrate and cause ill effects on the tone production (see the acoustics study chart in Part 2 of this series—he may have been right). Jim found a material that was the right density and was air tight and put it in a precisely machined plastic housing. On top of this, Jim found a way to coat or impregnate the pad surface with actual gold. There are many theories about acoustic properties of different metals, none of which have been proven nor disproven.

The JS pads are an interesting engineering development in pad design and material application. Jim is constantly improving details in both his saxophone and flute pads and retiring design features that do not work out. In the time I have been aware of and installed the pads, the saxophone pads have gone through at least 3 revisions or changes, and the flute pads have had at least that many iterations. The flute pads have precise metal components, while the saxophone pads have all plastic housing (I assume for the sake of weight). When installed well and cared for, these pads are quite long lasting. Technicians should keep in mind that they were designed for an instrument with stainless steel mechanisms, so the proper prep work required is not to be glossed over.
The JS Gold pads can be installed using traditional methods. Jim has also devised methods for installation that involve springs to self-level the pads or magnets to provide the perfect amount of pressure against the pad. Since the flute pads have a rigid collar in the middle of the pad, a common error is to tighten the pad screw just a little too much and make a lot more work for oneself.
There are other types of engineered pads out there; many I have tried and found to be lacking, and there are many more I am sure to be unaware of. The pads I surveyed in this article are ones I use and endorse without hesitation if the instrument is appropriate to use them. The common thread with all of these engineered pads is the need for durable high precision mechanisms and properly prepared toneholes. There are right places to install them and wrong places to install them. There are very limited ways to install them correctly and countless ways to install them wrong.
At the Woodwindfixer’s Bench is a publication of Jeff’s Woodwind Shop, a repair shop for professional woodwind players in Baltimore, MD. Visit www.woodwindfixer.com for more information.